# Welcome to OctoXLabs Documentation Portal
#### **Most Comprehensive Cybersecurity Asset Management Solutions**
# Installation & System Requirements
## OctoXLabs Architecture & Requirements
## Supported Operating System
# Setting up OctoXLabs
# Installing OctoXLabs
Welcome to the installation guide for OctoXLabs. This document provides step-by-step instructions for setting up OctoXLabs on Linux systems.
## Prerequisites
* A Linux system (Ubuntu/Debian or Red Hat-based distribution).
* Root or sudo privileges.
* OctoXLabs installation package.
### Step 1: Upload the Installation Package
Upload the installation package to the /tmp directory on your Linux system. You can use tools like scp or any other file transfer method.
```
scp octoxlabs-package.deb user@yourserver:/tmp/
```
Replace octoxlabs-package.deb with the actual package file name.
### Step 2: Install the Package
Navigate to the /tmp directory and install the package using the appropriate command based on your Linux distribution:
For Debian-based distributions (Ubuntu, etc.):
```
dpkg -i /tmp/PACKAGE_PATH
```
For Red Hat-based distributions (RHEL, CentOS, etc.):
```
rpm -i /tmp/PACKAGE_PATH
```
{% hint style="info" %}
Replace PACKAGE\_PATH with the actual file name of the installation package.
{% endhint %}
### Step 3: Run the Setup Script
Once the installation is complete, execute the setup script:
```
sudo octox-ctl -x setup
```
### Step 4: Configure the Setup
The setup script will guide you through the following configurations:
1. **Select Host IP:**
1. The script will detect the available IP addresses on your host.
2. Choose the IP address where the installation was performed and press Enter.
2. **Enter Root Company Name:**
1. The script will prompt you for a root company name.
2. Enter the name and press Enter.
### Step 5: Set the Connector's Token
1. From the user interface, navigate to **Settings > Connector (in Data Source Settings)**.
2. Select the **Edit** button for **Default Connector**.
3. Execute the command in the CLI:
```
octox-ctl -x token
```
4. Paste the resulting token into the **Token** field in the user interface. (Optionally assign a proxy if required.)
5. Click **Save**, then press **Send Test**; if the test succeeds, the connector is ready for use.
### Step 6: Finalize Setup
The setup will conclude after the script executes successfully. You should see a confirmation message indicating that OctoXLabs has been installed and configured.
### Troubleshooting
* E**rror with dpkg or rpm:** Ensure you’re using the correct package for your distribution.
* **Permission Denied:** Confirm that you have root or sudo privileges.
# Updating OctoXLabs
This guide covers the process of stopping Octoxlabs services, running the update package and then configuring updates and starting all services again.
### Step 1: Stop All Services
Before updating the OctoX platform, you must turn off all services. Use the following commands:
```
octox-ctl -x down
```
### Step 2: Run the Update Package
Ubuntu or Debian
```
$ dpkg -i octoxlabs_***.deb
```
Redhat or CentOS
```
$ rpm -i --force octoxlabs_***.rpm
```
{% hint style="info" %}
In the file name, which is in the form of octoxlabs\_\*\**, the full file name must be placed where there is an asterisk (*). For example, octoxlabs\_stable\_4.0.0\_amd64\_202402020623\_update.rpm.
{% endhint %}
### Step 3: Start All Services
```
octox-ctl -x up
```
At the end of this process, the OctoXLabs update will be completed.
# Add SSL Certificate to OctoXLabs
SSL certificates are essential for ensuring secure communication and enhancing the overall security of the OctoXLabs environment. This guide is written to help users add an SSL certificate to the Octo
In this tutorial, you will learn how to:
* Add a SSL certificate to OctoXLabs domain
* Change the SSL certificate of OctoXLabs domain
### Before you start
Before you start, make sure that you have:
* A DNS/domain name issued for the platform where OctoXLabs is running
* A .crt and its accompanying .key file for the issued DNS/domain name
### Step 1: Shut Down Backend and Frontend
Before starting to add the SSL certificate, you need to shut down the OctoXLabs platform:
```
octox-ctl -x down
```
{% hint style="info" %}
Ensure that both the backend and frontend are completely shut down before proceeding.
{% endhint %}
### Step 2: Prepare Necessary Files
If you have a `.pass` file associated with your certificate and key files, include this file in the process. If not, create an empty `.pass` file using the following command:
```
touch octoxlabs.pass
```
Place your `.cer`, `.key` and `.pass` files under the directory `/tmp`. If you would like to place the files under a different path, you may do so.
### Step 3: Add the SSL Certificate
{% hint style="warning" %}
The SSL certificate to be used must be in `.crt` format.
{% endhint %}
Use the following command to add the SSL certificate, key, and optional password file to the OctoXLabs platform:
```
octox-ctl -x set -c -k -p
```
{% hint style="info" %}
Replace \, \, and \ with the actual file paths.
{% endhint %}
### Step 4: Complete the Setup
After successfully adding the SSL certificate, start the platform to apply the changes:
```
octox-ctl -x up
```
Following these steps will secure your OctoXLabs platform with an SSL certificate. You can verify the successful addition by accessing the platform through your browser.
{% hint style="success" %}
Remember to keep your SSL certificate files secure and update them regularly.
{% endhint %}
# Using OctoXLabs
# Connect Adapters
You can collect and correlate information about your assets by using OctoXLabs adapters, which integrate with a wide array of security and IT management solutions.
### Adding a New Adapter Connection
1. Open the Adapters page by clicking the image.png adapter icon on the left navigation panel.
2. Click in the Search field to search for one or more adapter names to help you connect relevant adapters.
3. Click the relevant adapter. The Adapter Profile page displays the list of configured connections if there's any.
4. To add a new connection, click Add Connection. The Adapter Connection Configuration module opens.
5. Populate the required information.
6. To save the configuration changes, click Save.
7. Test the network connectivity to the supplied hostname or the IP address, click Connection Test.
{% hint style="warning" %}
You should always check for network connectivity after setting up adapter configurations to avoid connectivity related problems during discovery.
{% endhint %}
To set the connection as inactive, switch off the Enabled toggle button. When switched off, the configured connection will be considered as inactive and during a discovery cycle, this connection will be ignored and no data will be fetched from its source.
# Examine a Device Profile
You can examine the details about your devices by looking at their profile pages, which displays the data that OctoXLabs collected and correlated from multiple sources.
To learn more about Device Profile, see:
* Asset Profile page
* Asset Profile Page - Complex Fields
### Searching for Assets
The search bar enables free text search to identify and investigate a specific asset.
To search for assets:
1. Click the search icon Searchicon to open the search bar on any OctoXLabs page.
2. Enter the text to be searched.
3. When you search for a specific text, depending on the page you're currently on, the search is executed on the main device or user attributes, including:
* Devices - *Asset name, host, manufacturer serial number, MAC addresses, IP addresses, last used users and tags etc.*
* Users - *Mail, username, first name, last name, tags etc.*
4. The search results are displayed in a table, sorted by the number of solutions discovered on the asset (by default, 'Adapters' column).
In the search page, you can:
* Investigate a specific asset - click any device or user record to review its details. For details, see Asset Profile page.
* View the entire device or user list of results - click 'View in Devices' or 'Click in Users' will display the complete list of results. For details, see Devices page and Users page.
### Running a Saved Query
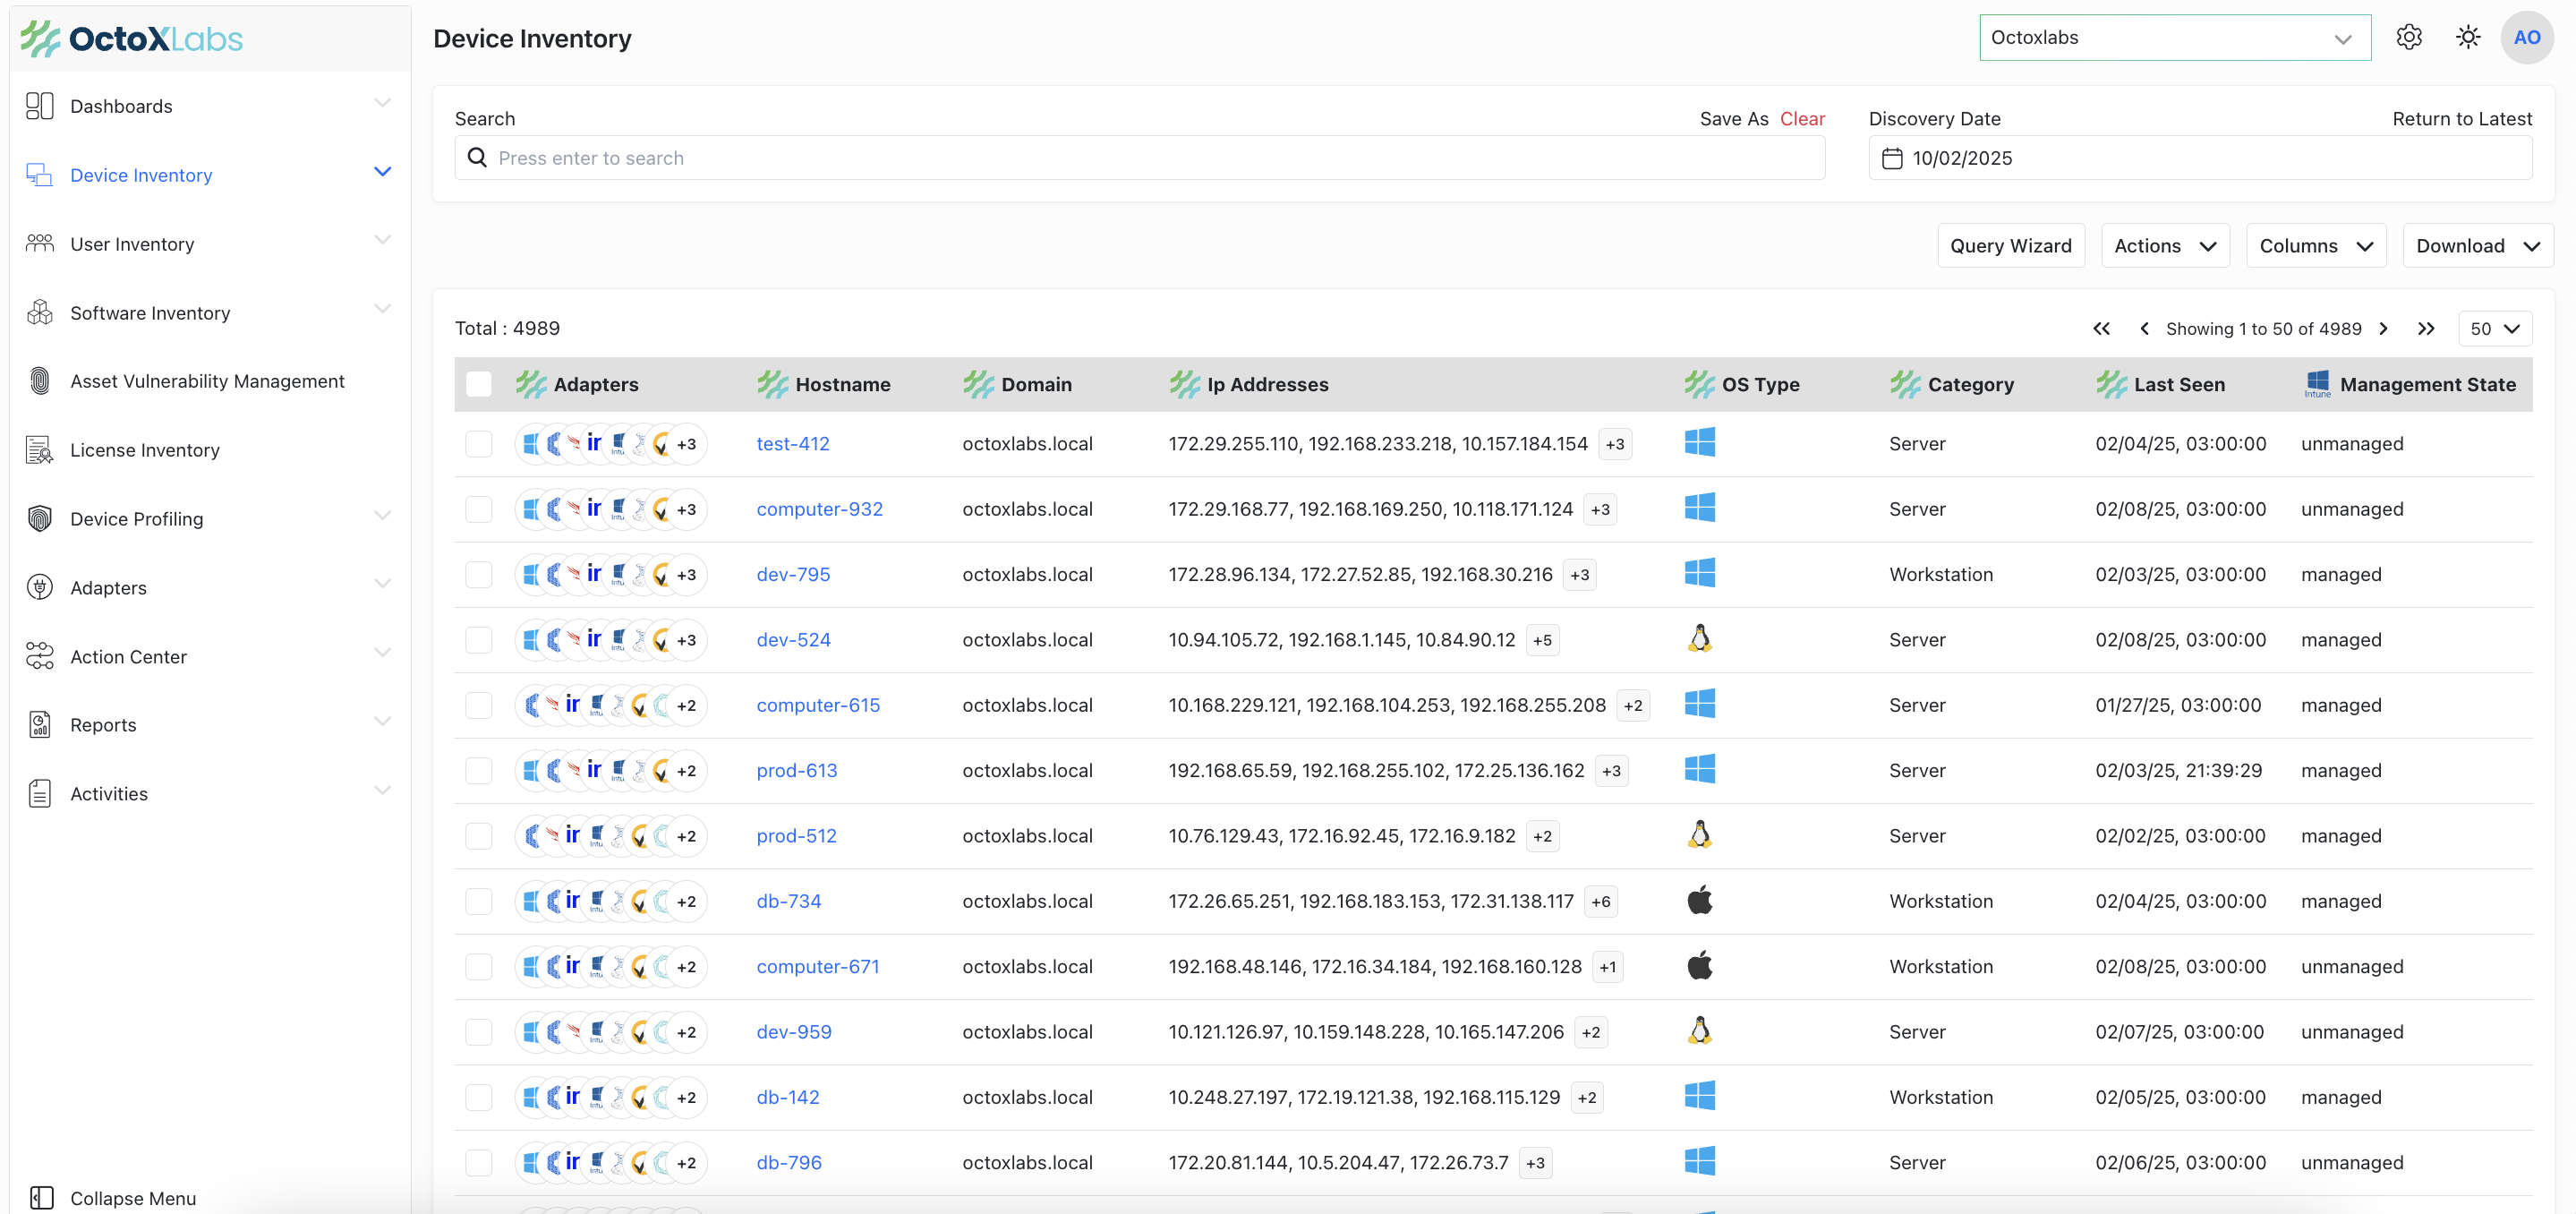
The Devices page displays all the collected devices for the chosen query. The query is displayed inside the search bar. If no query has been chosen, the page displays all collected devices.
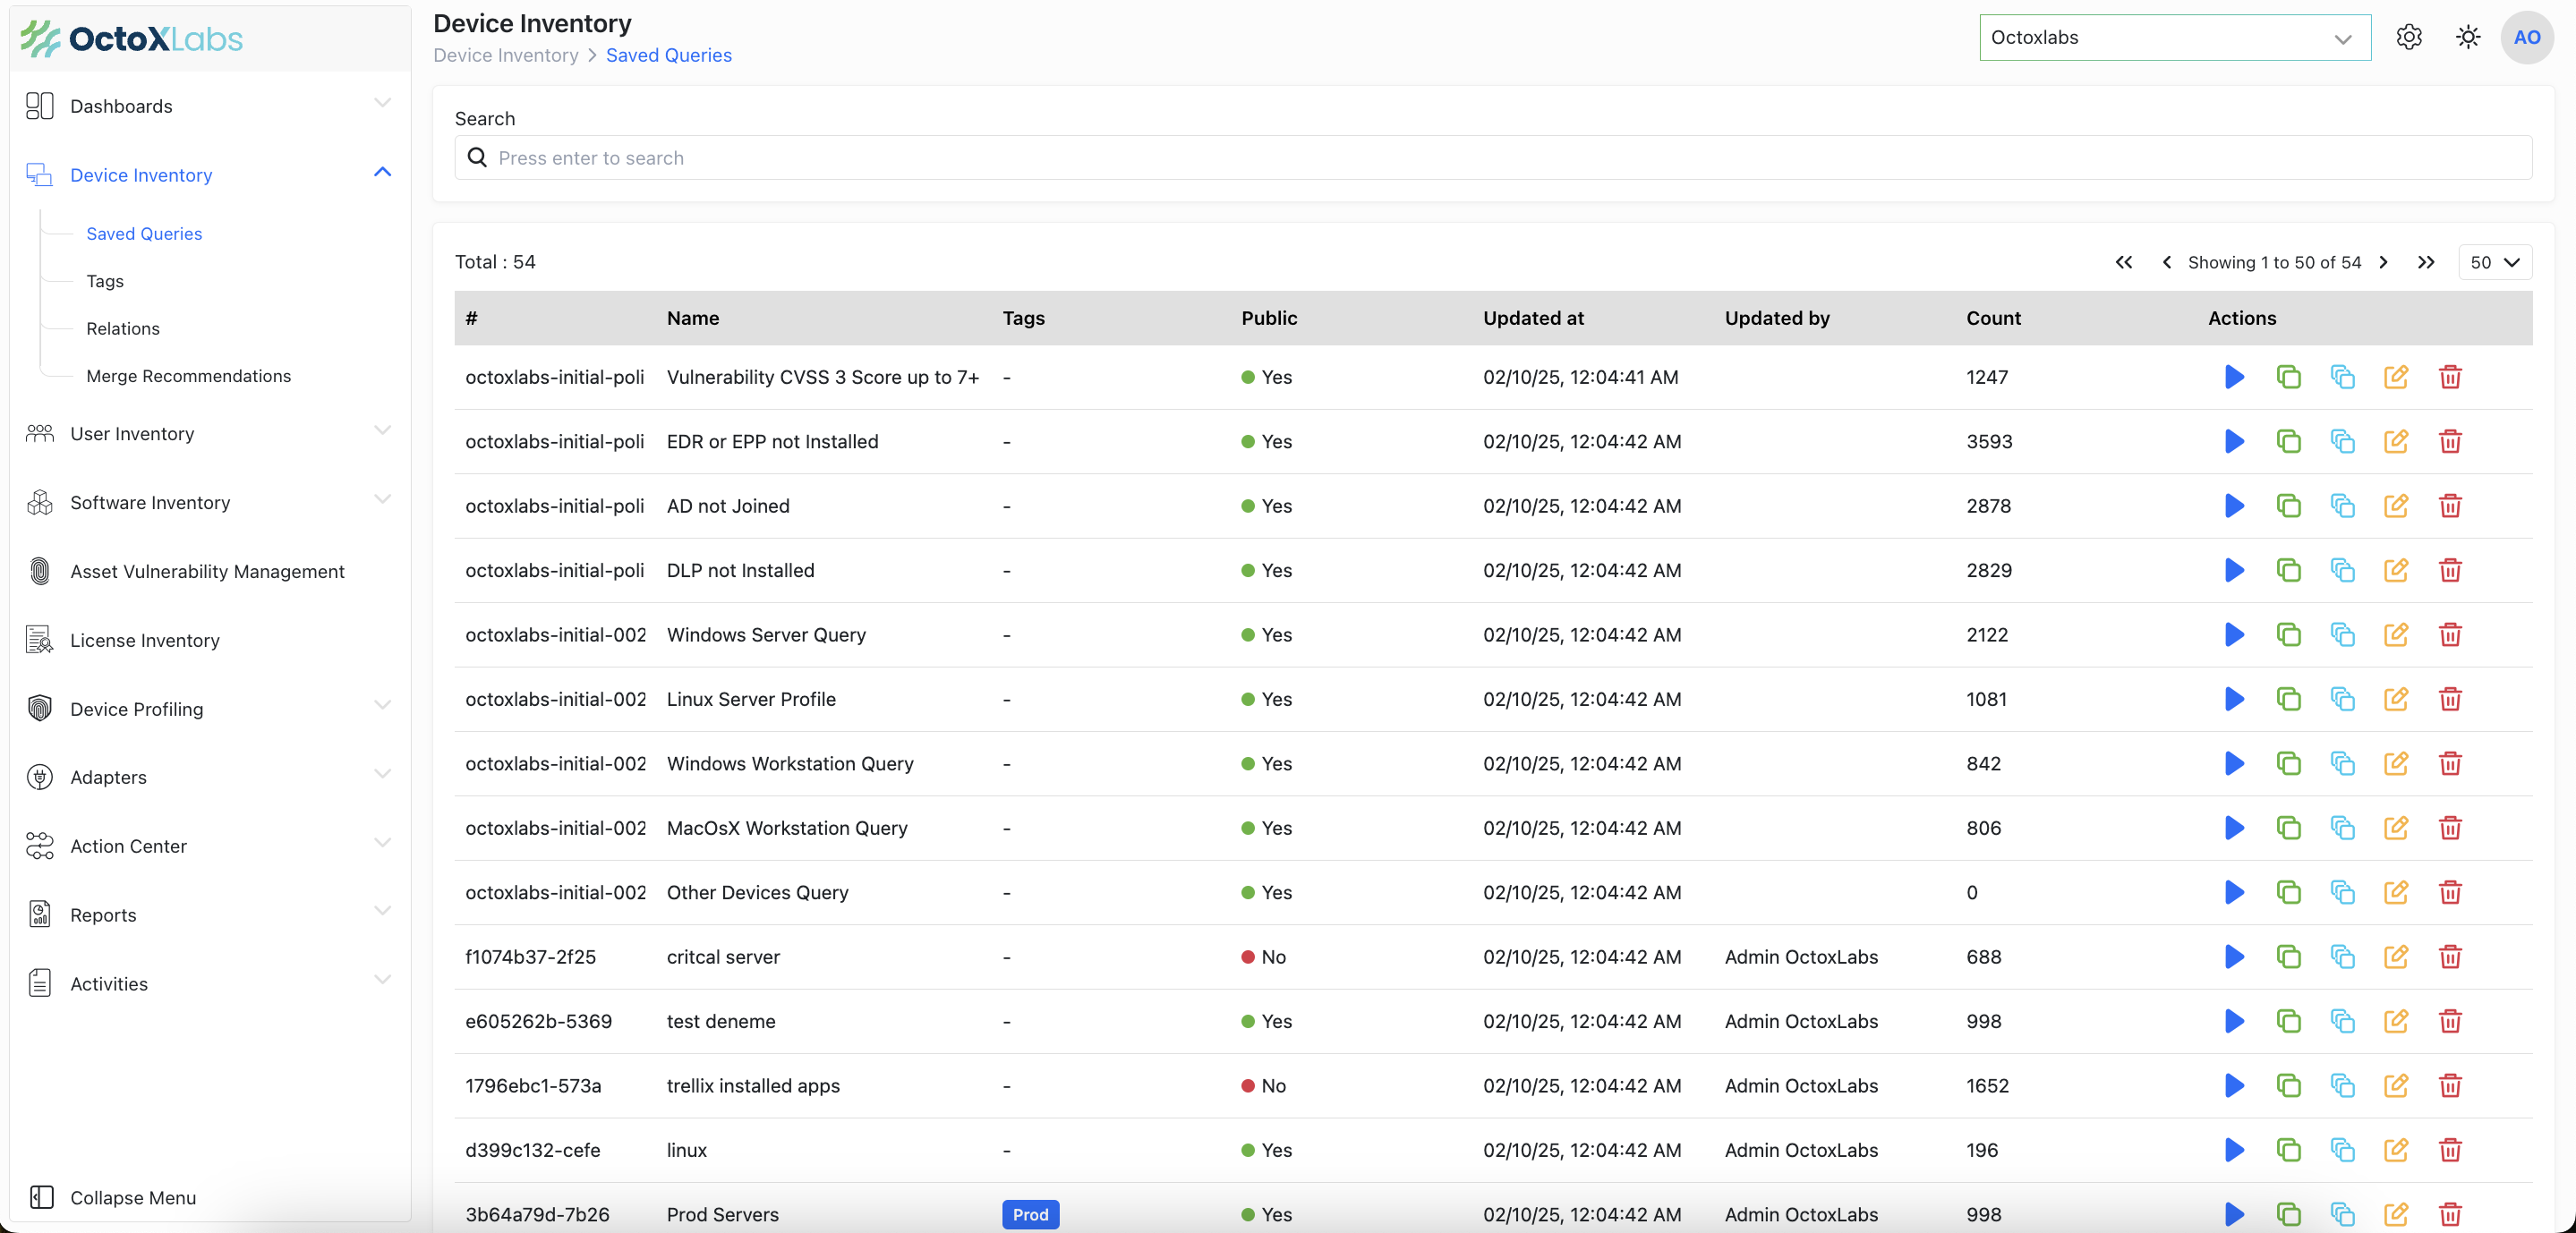
To run a saved query, hover on Devices icon and from the menu, select Saved Queries.
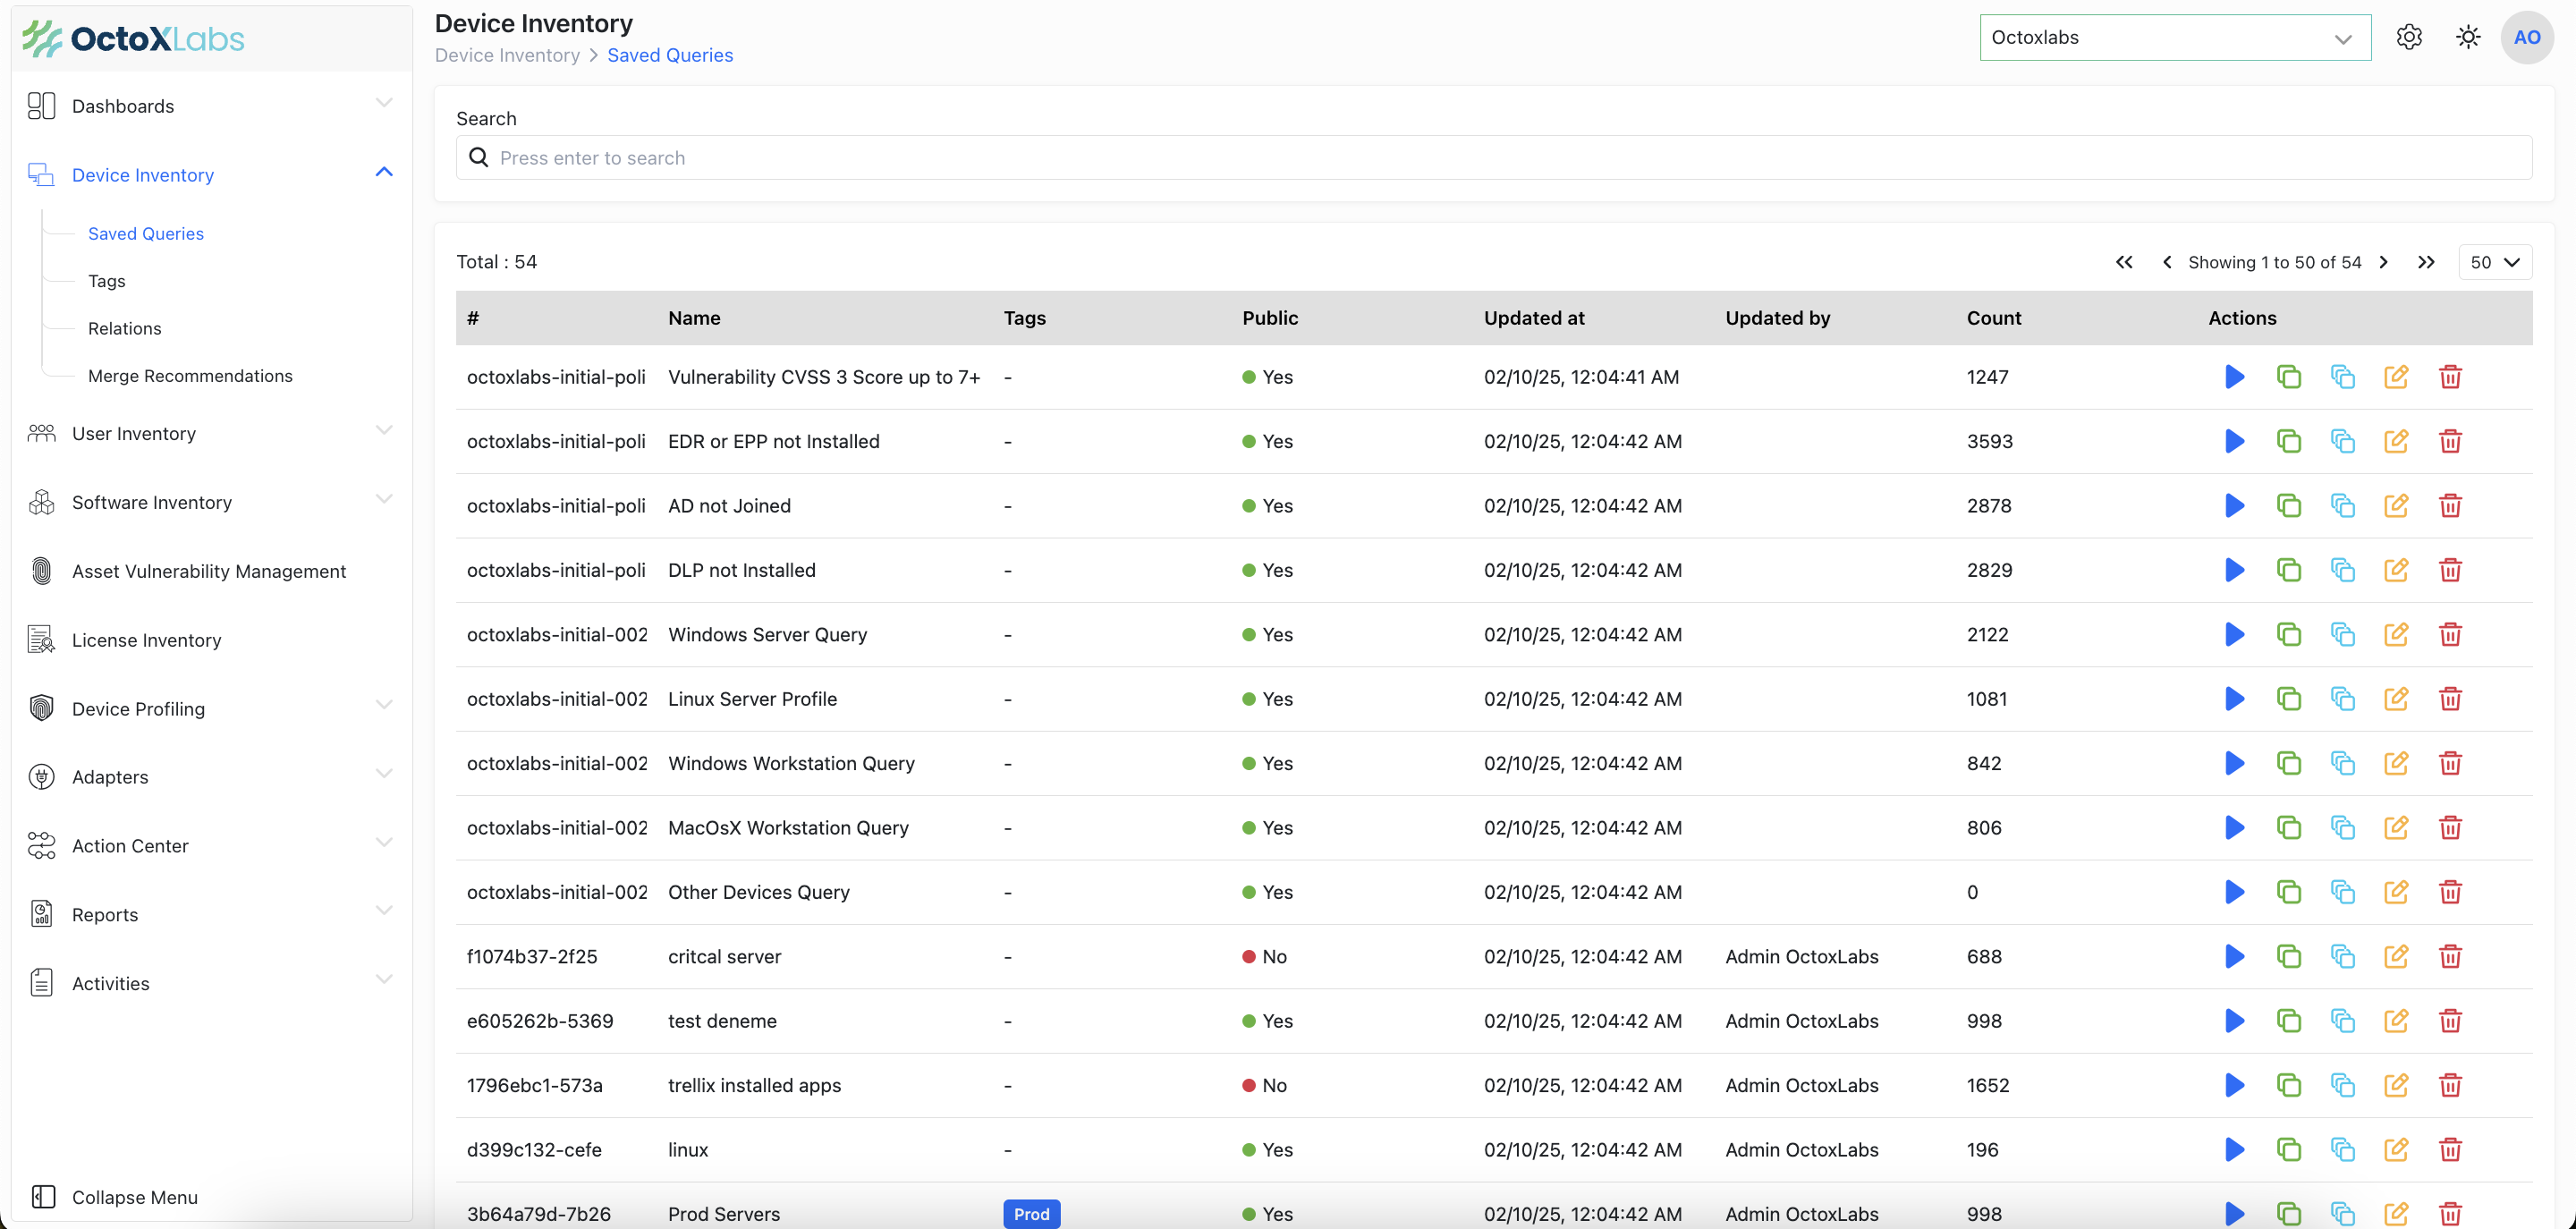
1. Click Saved Queries in the top right corner above the query results table. The Queries page opens, displaying all the saved queries filtered by device entities.
2. Search for a query and click its record to view its details and then run it.
3. Click any device record to review its details. For details, see Asset Profile page.
### Running your Own Query
Use the Query Wizard to create granular queries to understand how assets adhere to their policies.
To create and run your own query:
1. From the Devices page, click Query Wizard on the top right corner above the Devices table.
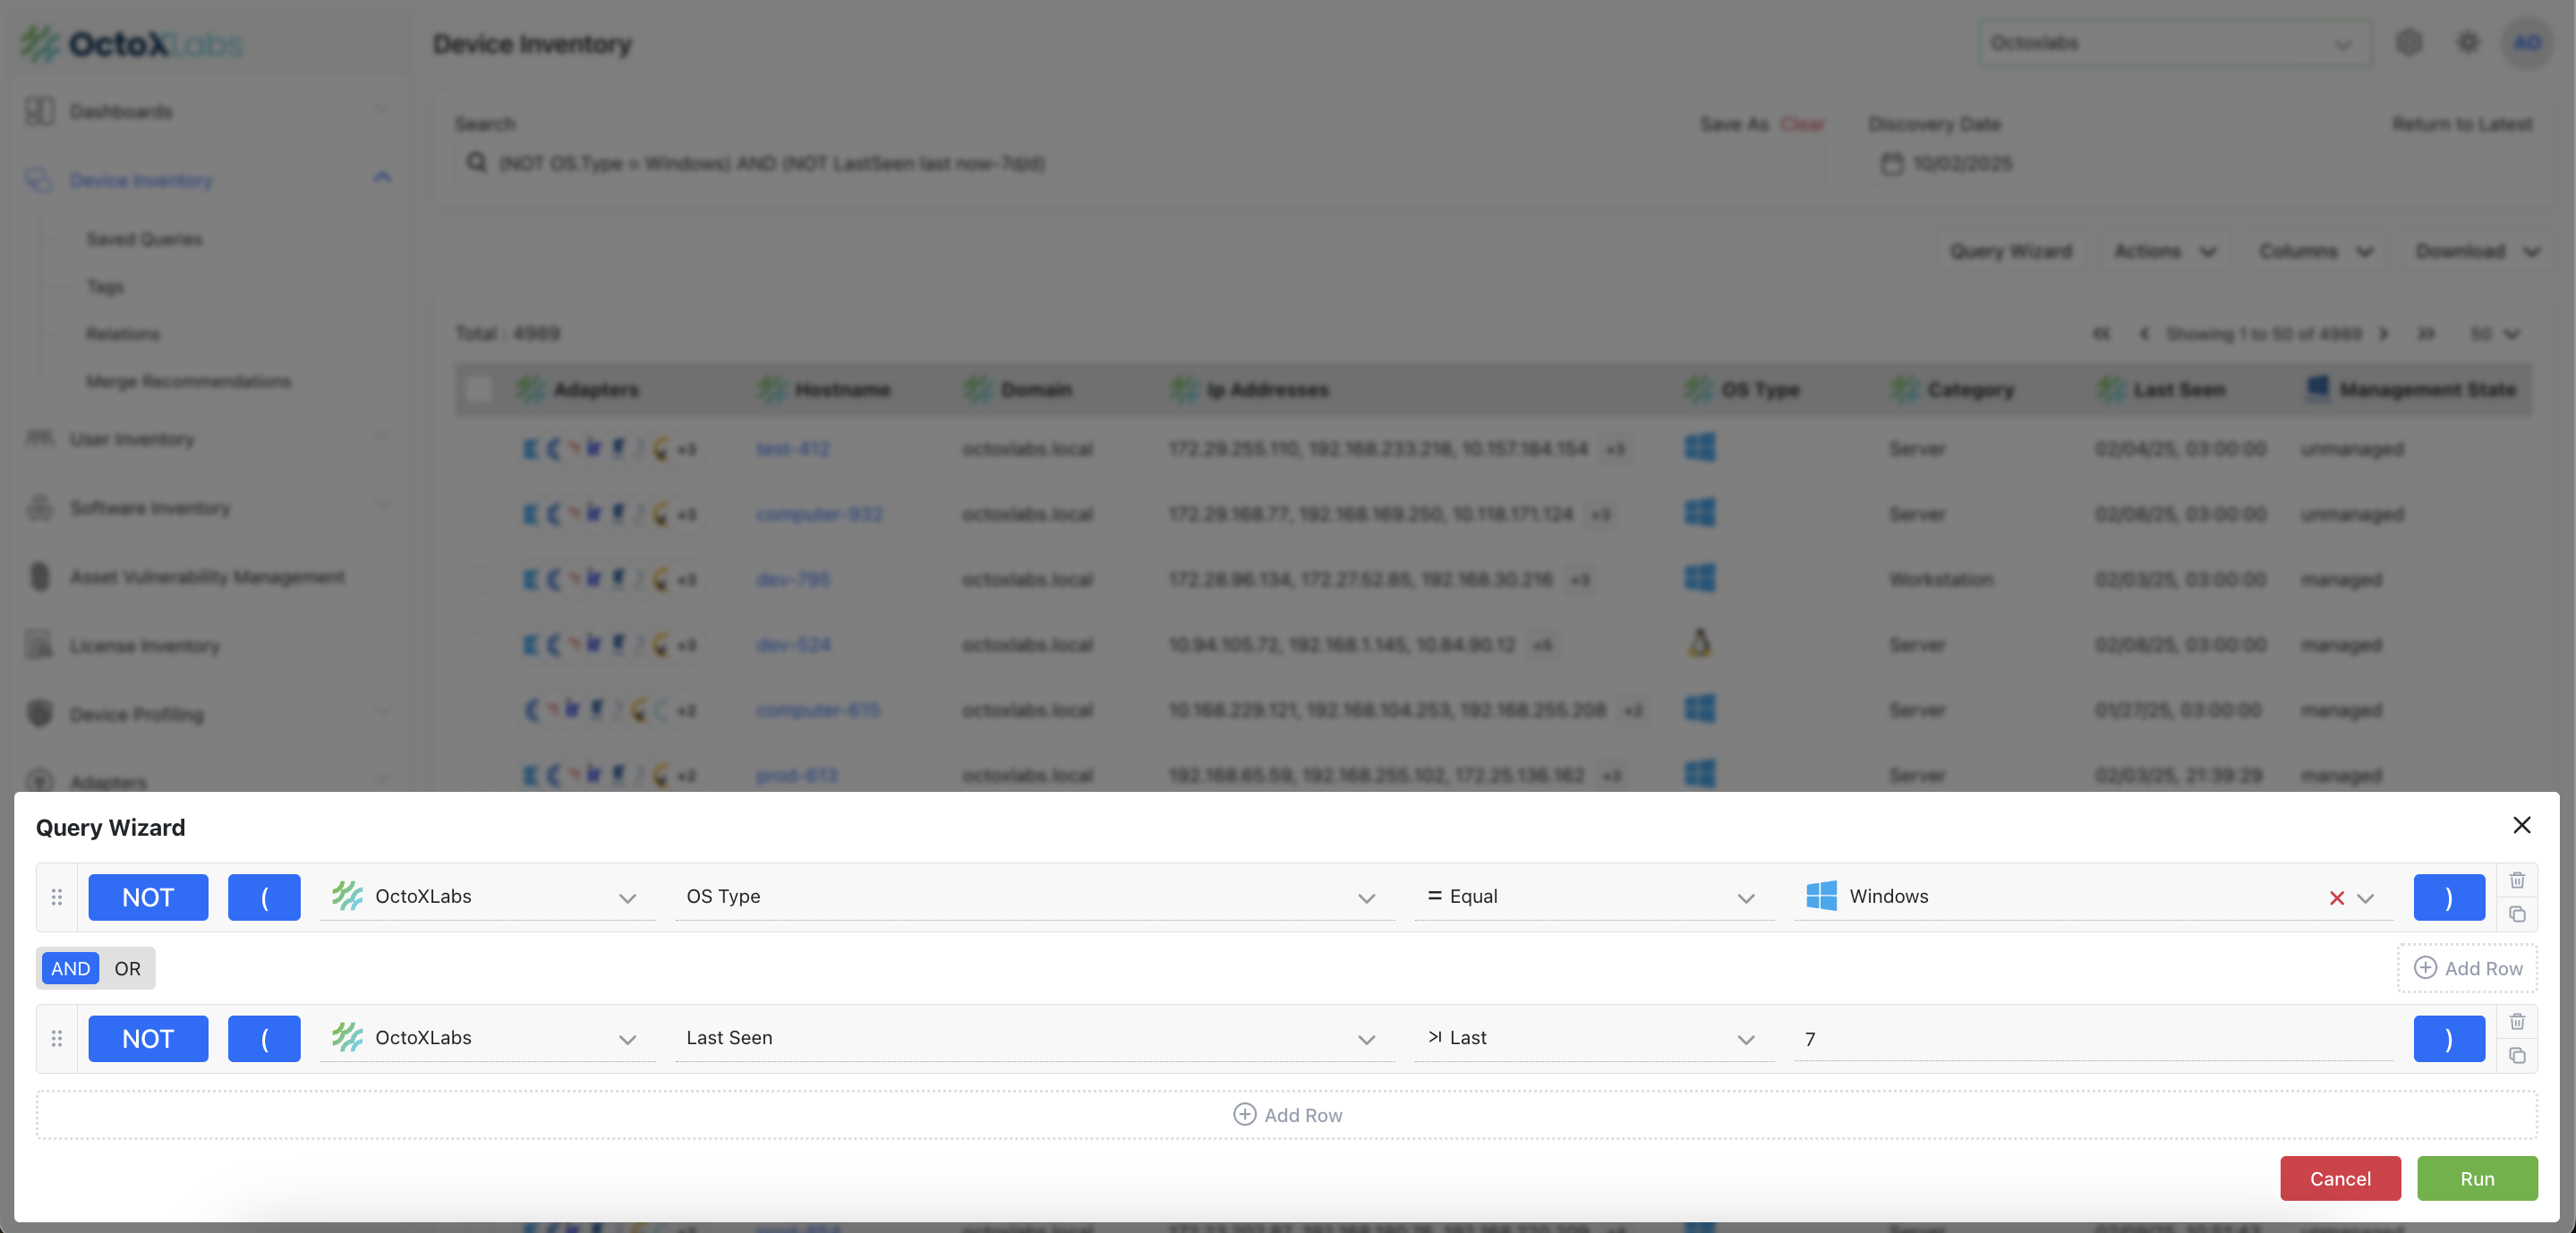
2. Use the Query Wizard to add filtering expressions on different properties of devices. You can create multiple filter expressions and decide on the logical operators between them to create complex filtering conditions.
For example, the expression below filters all devices with a Windows operating system (using OS Type field) that were seen in OctoXLabs in the last 7 days:
The Query Wizard consists of the following elements which require user input to create a filter expression:
* AND/OR switch
* NOT Flag
* Source drop-down
* Field drop-down
* Operator drop-down
* Value field
* Bracket controls
To run the query, click Search. Click any device record to review its details.
For details, see Asset Profile page.
# Tag a Device
Use tags to assign context to your assets for granular filters and queries. You can tag a single asset or a group of assets that share common characteristics.
After creating queries and investigating devices and adherence to policies, you can perform actions, such as Tag, on a single selected device or in bulk of selected devices.
You can use the tags in future queries, for example:
### How to Tag a Device
To tag a device:
1. Open the Devices page and run a saved query or run your own query.
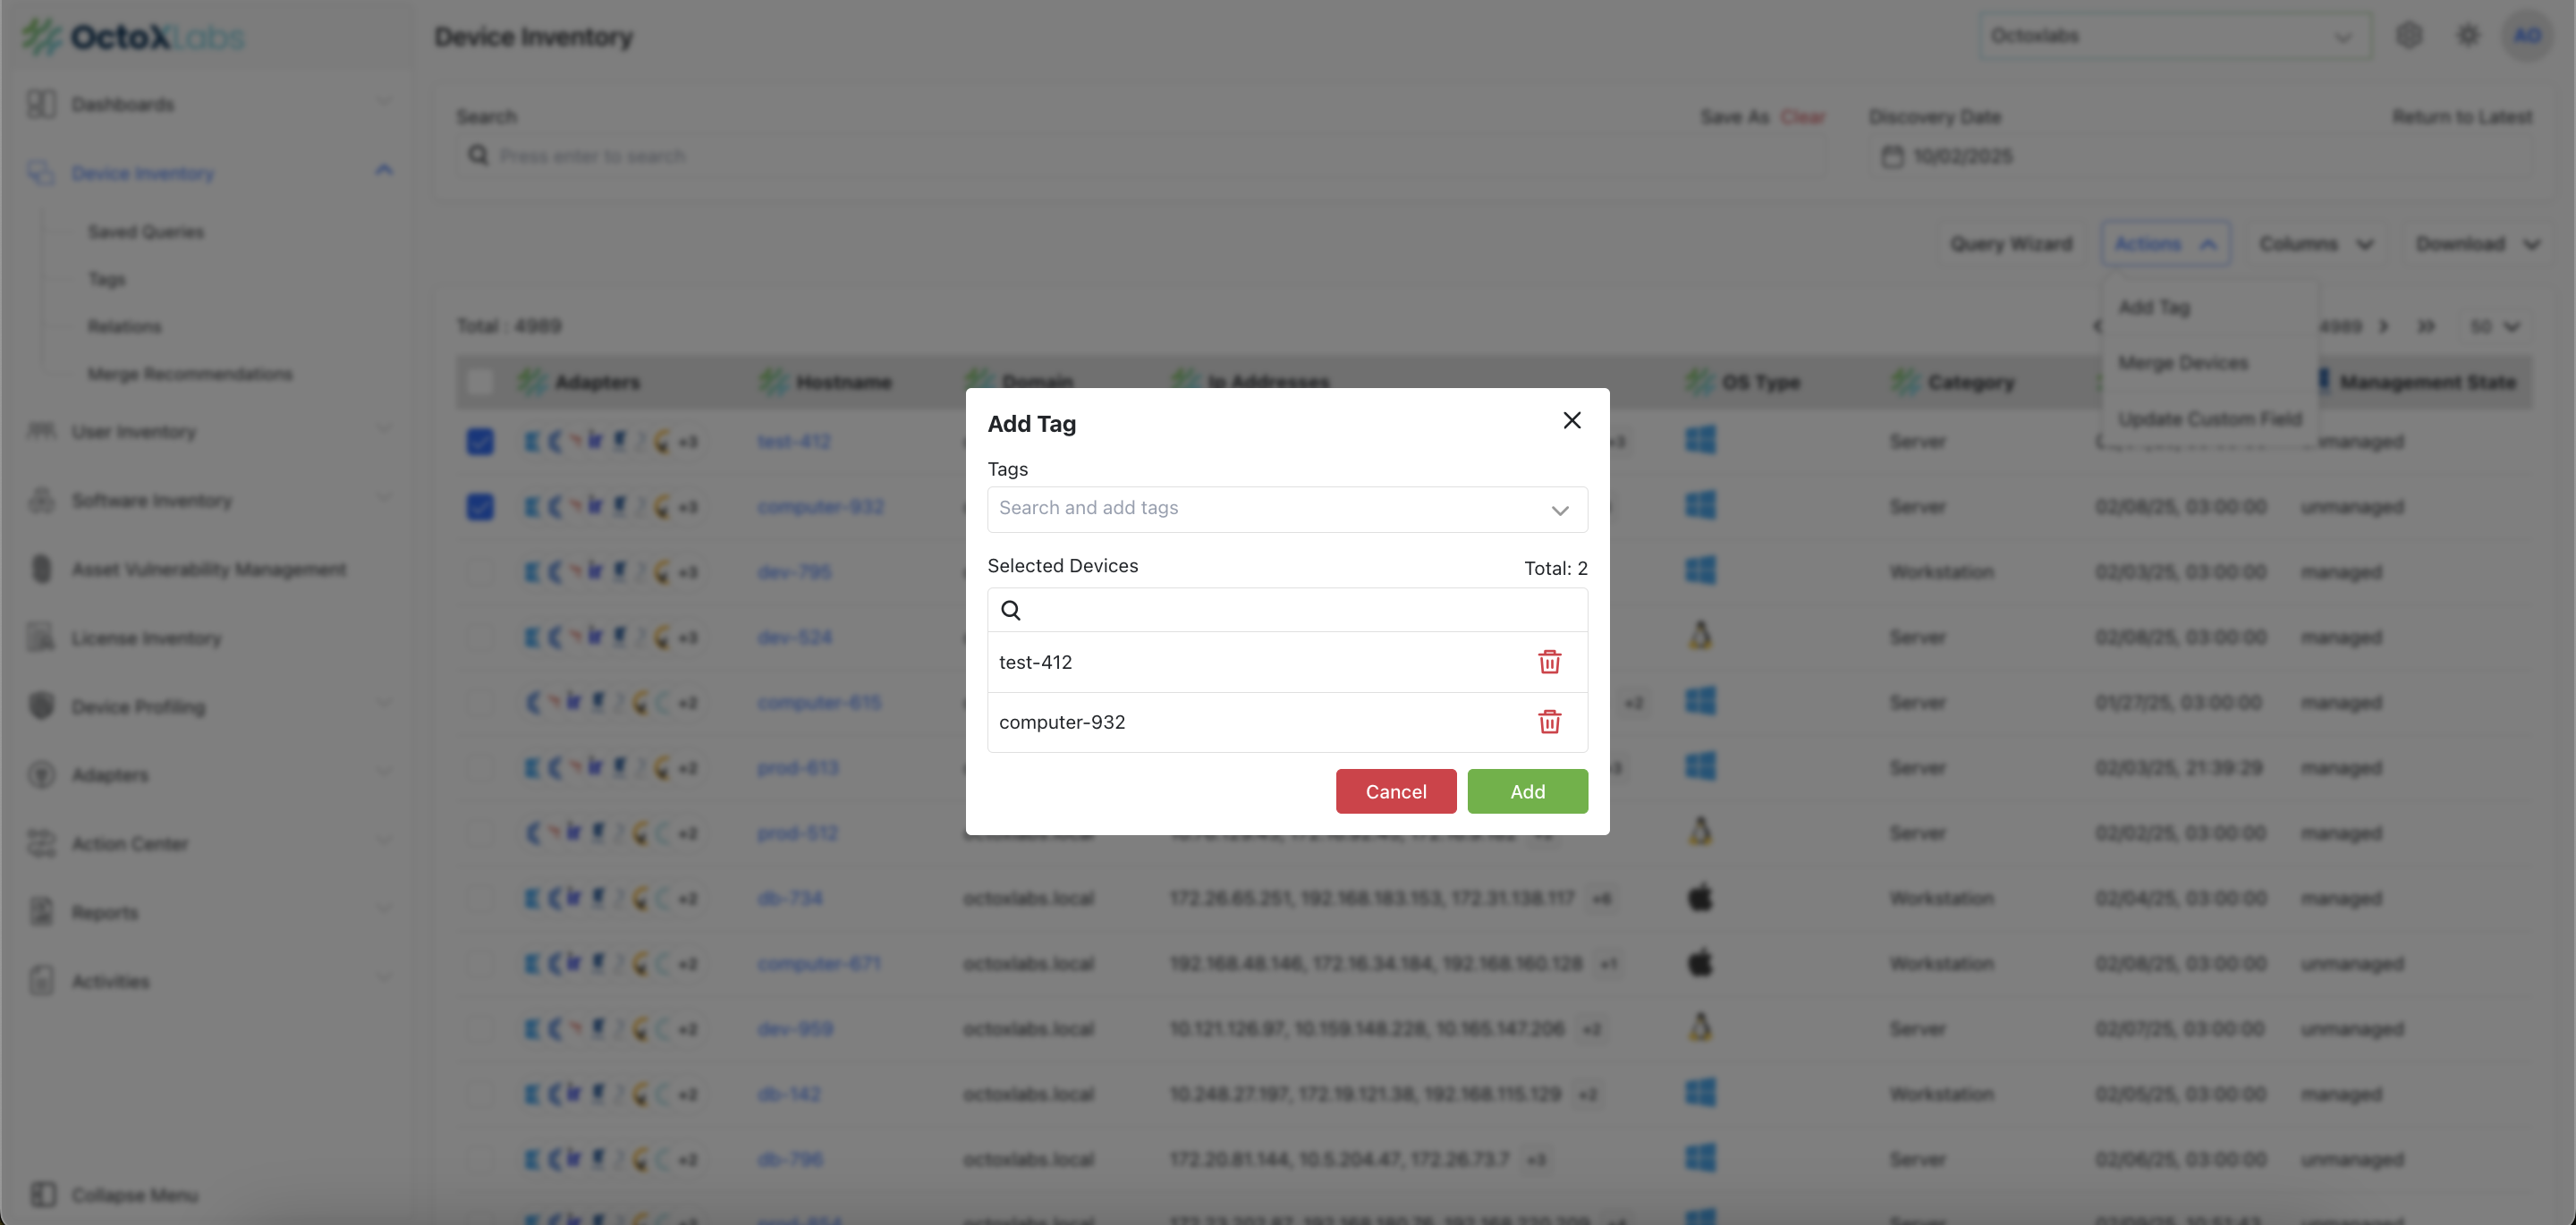
2. Select one or multiple device record checkboxes. Once at least one device is selected, Actions is displayed above the query results table.
3. Click Actions and then click Tag. The Tag Devices dialog opens.
5. Apply new or existing tags to the selected devices. The list of selected tags is applied to all selected devices. Therefore, tagging may result in the removal of existing tags from one or from several of the selected devices. Refer to Working with Tags to learn more about using tags.
6. Click Save.
### Asset Profile - Tags Tab
You can use the Tags tab in the Asset Profile page to add and to edit tags associated with a device. This tab displays the list of tags associated with the device.
To edit the device tags, click Manage Tags. Select the tags to be associated with the device and clear tags you wish to unassociate from the device.
To learn more about the Asset Profile, see the Asset Profile page.
# Save a Query
You can identify security gaps by running and saving a query about your assets.
OctoXLabs supports a variety of asset management use cases, that can be implemented by running the right query. Read about some common use cases are described in the OctoXLabs documentation site, under the Using OctoXLabs category in the Use Cases subcategory.
Use the navigation tree and the search bar to explore the various use cases, that include, but are not limited to:
* Finding Endpoints Missing Agents
* Finding Endpoint Agents Not Functioning Correctly
* Finding Devices Not Being Scanned For Vulnerabilities
* Discovering Cloud Instances Not Being Scanned For Vulnerabilities
* Finding Unmanaged Devices
* Finding Rogue Devices On Privileged Networks
### Create and Save a Query
To create and run your own query:
1. From the Devices page, click Query Wizard on the top right corner above the Devices table.
2. The popup opens enables you to add filtering expressions upon different properties of devices. You can create multiple filter expressions and decide on the logical operators between them to create complex filtering conditions.
3. For example, the expression below filters all devices which Windows is their operating system (OS Type) and such devices were seen in OctoXLabs in the last 7 days:
4. The Query Wizard consists of following elements which requires the user input to create a filter expression:
* AND/OR switch
* NOT Flag
* Source drop-down
* Field drop-down
* Operator drop-down
* Value field
* Bracket control
5. To run the query, click Search. To learn more about the Query Wizard and advanced querying, see Creating Queries with the Query Wizard.
6. To change the displayed columns, click Edit Columns on the right side of the page just above the table.
7. Pick any field from any adapter by selecting it on the top left selection. You can also narrow down the list of properties by typing into the search bar.
{% hint style="info" %}
Click **Reset Columns** to reset the Devices page to its default column view. Click on **Clear** to
{% endhint %}
8. To save a new unsaved query, click Save As next to the query name. The Save as dialog opens, and you can set a name for the new saved query.
To learn more about working with saved queries, see Queries.
### Modify an Existing Query
To modify a saved query:
1. Click Saved Queries on the top of search bar.
2. The Saved Queries page opens, displaying all the saved queries.
3. Search for a query and click its record to review its details.
4. Click Run Query to execute it.
Use the Query Wizard to change the query expressions or click Edit Columns to edit the query table columns. You can also:
* **Rename** a saved query by a single click on the query name.
* **Save** - Update the saved query you are working on.
* **Copy** - Save the query results as a new saved query.
{% hint style="info" %}
Click **Cancel** to undo any changes made on the saved query you are working on and reload the saved query.
{% endhint %}
To learn more about working with saved queries, see Queries.
To learn more about the Query Wizard elements and advanced querying, see Creating Queries with the Query Wizard.
# Create a Dashboard Chart
You can customize the OctoXLabs Dashboard with charts that track the relevant metrics and show immediate insights based on your saved queries.
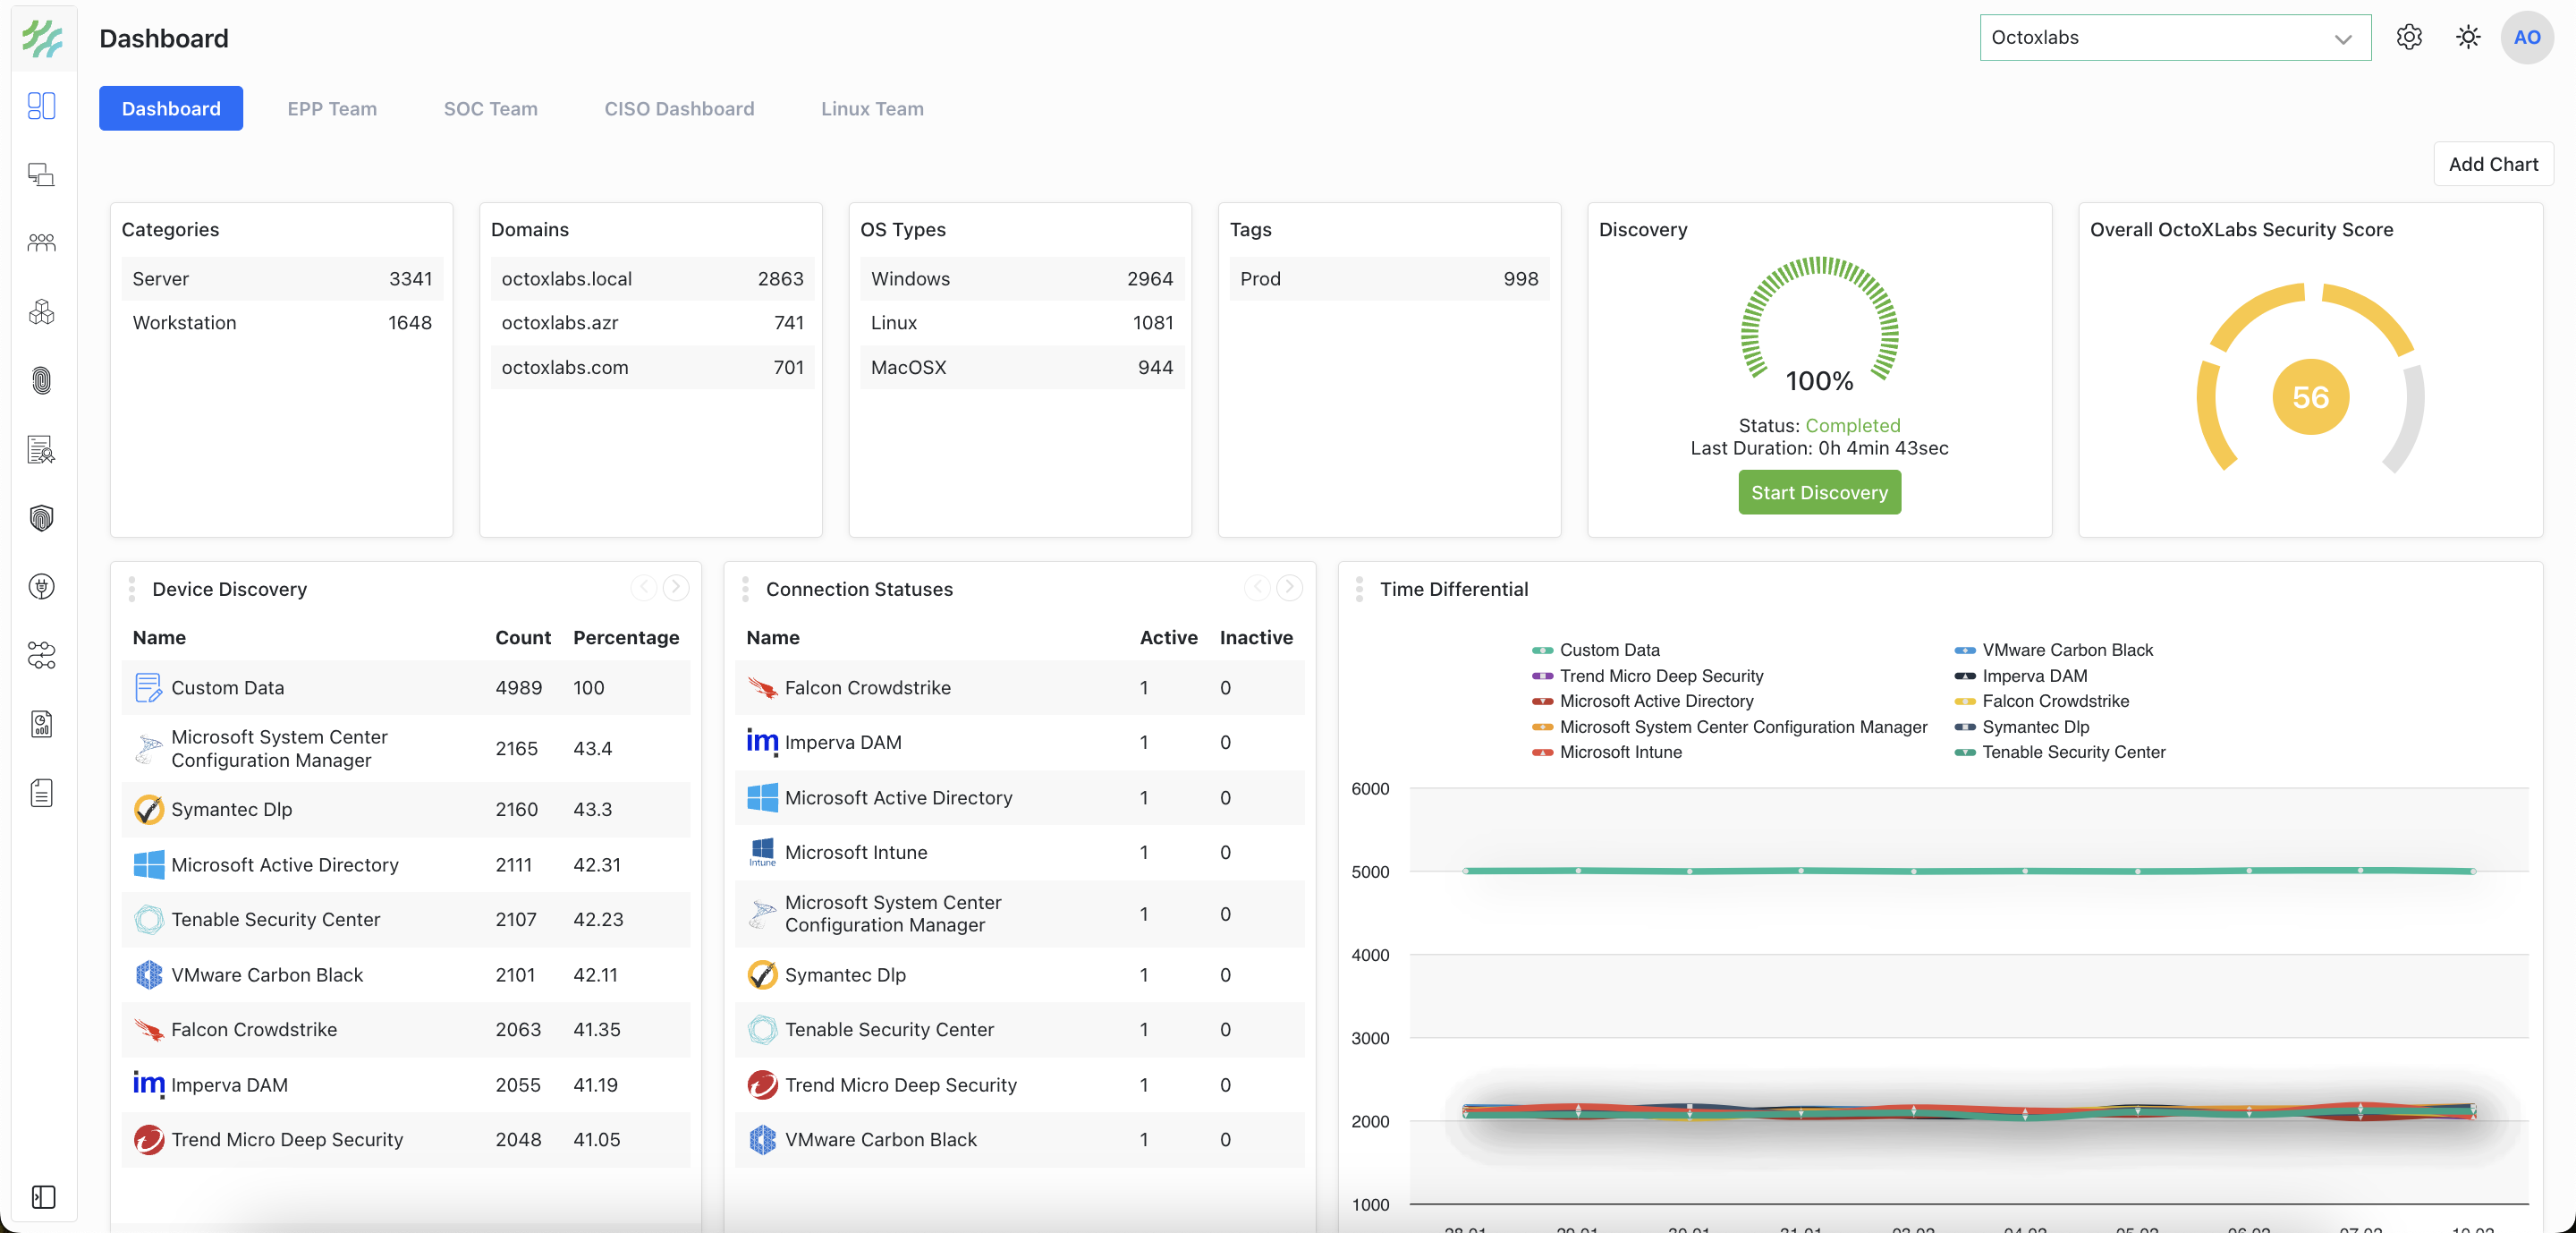
The OctoXLabs Dashboard page opens by default every time you login to OctoXLabs. You can open the dashboard page by clicking the image.png icon on the left navigation panel.
DashboardNewComplete.png
The dashboard consists of:
* **Search Bar** - Provides a free text search to identify and investigate a specific asset.
* **Dashboards** - OctoXLabs includes two default Dashboards: "My Dashboard" and "OctoXLabs Dashboard".
* **Charts** - Once data is collected, the default OctoXLabs Dashboard appears, displaying the default OctoXLabs charts. For more details on each chart, see Default Charts.
{% hint style="info" %}
OctoXLabs Dashboard is displayed by default. You can add new charts to each Dashboard, add additional Dashboards for your needs, and rename and delete existing ones. For more details, see Working with Dashboards.
{% endhint %}
### Creating New Dashboards and Charts
OctoXLabs includes two default dashboard spaces: OctoXLabs Dashboard and Custom Dashboards.
OctoXLabs Dashboard is displayed by default as your homepage.
To create a new Dashboard with charts
* Open the Dashboard page by clicking the image.png icon on the left navigation panel.
* Click Add Dashboard to add a new empty Dashboard.
* Click the large + card to configure a new chart. For details about OctoXLabs custom charts types and the required configuration, see Working with Custom Charts.
You can add additional dashboards for your needs, as well as rename and delete existing ones.
To learn more about Dashboards, see Working with Dashboards.
# Generate a Report
You can generate a PDF document to share Dashboards and query results in an executive-friendly format.
OctoXLabs Reports include the OctoXLabs Dashboard charts of the Dashboards selected, or a selected list of saved queries for any asset on your system, or a combination of both Dashboards and a selected list of saved queries. The report also includes links to the relevant OctoXLabs page providing additional details.
To learn more about Reports, see the Reports page.
### Configuring a Report
The Report Configuration opens allowing you to configure the report content and set its scheduling.
To configure a new report:
1. Open the Report Configuration page, from the left navigation panel, click reports icon. The Reports page opens.
2. Click **Add Report** to add a new report. To view and edit an existing report, click a specific report record in the table.
3. Provide a report name, which must be unique.
4. Under Report Configuration:
1. Select whether to create a private or a public report. Private reports may include:
2. My Dashboard space charts.
3. Private saved queries.
* If enabled, the report will be private and can only be viewed, edited or deleted by the user that created and owns that report.
* If disabled, the report will be a public report. Any user with the right report permissions can view, edit or delete that report.
4. Select whether to include dashboard charts and then select which dashboard spaces to include.
5. Select whether to include Saved Queries and then configure a list of selected saved queries.
6. Select Generate CSV with queries results to create a CSV file with the entire saved query results for each of the listed saved queries. When you first run a report, it could take a few minutes to generate the CSV file.
7. To schedule an email sent with the report attached, select the Email Configuration checkbox.
8. Specify email subject, list of recipients and recipients CC, and select the email schedule (every x days, every x hours, on sets days of the week, or on set days of the month).
{% hint style="info" %}
If you have configured a scheduled email, Send Email is displayed. Click it to send an email with the latest generated report.
{% endhint %}
To download the latest generated report, click **Download**.
You can download the latest generated report as a PDF file, a CSV file or as both CSV and PDF.
To learn more about configuring reports, see Report Configuration Page.
### Configuring an Email Server
To schedule an email sent with the report attached, you must configure an email server.
To configure an email server, from System Settings, under External Integrations select Email enable Send emails and configure the email host and port. For more details, see Configuring - Email Settings.
# Adapters
# 1E Tachyon
## Connection Requirements
{% stepper %}
{% step %}
### IP
IP address of the 1E Tachyon server.
{% endstep %}
{% step %}
### Port
Connection port. 1E Tachyon typically uses port 443.
{% endstep %}
{% step %}
### Is Secure?
Enable this option if the connection will be established over HTTPS.
{% endstep %}
{% step %}
### Timeout
Max seconds to wait for server response before aborting the request.
{% endstep %}
{% endstepper %}
{% hint style="warning" %}
⚠️ **Attention**\
Please perform a **connection test** to ensure there is a valid connection to the host.\
When the discovery operation is finalized, you will be able to see the details on the **Assets** page.
{% endhint %}
# 3Play Media
## Connection Requirements
{% stepper %}
{% step %}
### Domain
The Domain of the 3Play Media.\
Default: `api.3pmstaging.com`
{% endstep %}
{% step %}
### API Key
The 3Play Media API uses API keys to authenticate requests. You can manage your Admin and Project API keys on the [API Access Management](https://account.3playmedia.com/api_accesses) page. You need the "Admin" access level.
{% endstep %}
{% step %}
### Proxy
Proxy URL. (optional)
{% endstep %}
{% endstepper %}
{% hint style="warning" %}
⚠️ Attention
Please perform a connection test to ensure there is a valid connection to the 3Play Media host. When the discovery operation is finalized you will be able to see the details on the Assets page.
{% endhint %}
# A Cloud Guru
## Connection Requirements
{% stepper %}
{% step %}
### IP
IP address of the A Cloud Guru Host.
{% endstep %}
{% step %}
### Port
Port number (optional, default: 443).
{% endstep %}
{% step %}
### API Token & User ID
The credentials which will be used by OctoXLabs CSAM PLATFORM Asset to fetch data from A Cloud Guru.
{% endstep %}
{% step %}
### Proxy
Proxy URL (optional).
{% endstep %}
{% step %}
### SSL
Use SSL for connection (optional, default: Encrypted).
{% endstep %}
{% endstepper %}
{% hint style="info" %}
Visit A Cloud Guru - API Settings. Click "Create Application" and enter a name to describe your integration. Click "Create" and download your Consumer ID and API key credentials. Your credentials must have read permissions for users.
{% endhint %}
{% hint style="warning" %}
Please perform a connection test to ensure there is a valid connection to the host.\
When the discovery operation is finalized, you will be able to see the details on the Assets page.
{% endhint %}
# A10 aGalaxy
## Connection Requirements
### 1 - URL & Port
Enter the management URL of your A10 aGalaxy instance (e.g. `https://agalaxy.example.com`). Specify the API port if different from default (443).
### 2 - Credentials
Provide a **Username** and **Password** with sufficient privileges to access DDOS zones and domain configurations.
{% hint style="danger" %}
**Attention**
Please perform a connection test to ensure there is a valid connection to the A10 aGalaxy API. When the discovery operation is finalized you will be able to see the details on Assets page.
{% endhint %}
# A10 Defend Orchestrator
## Connection Requirements
### 1 - IP
IP address of your A10 Defend Orchestrator (ADO) host (e.g. `10.10.2.170`).
### 2 - Port
API port for the ADO instance (default: **443**).
### 3 - API Key
The API key can be found on the A10 Control Organization's home page. Navigate to your organization settings to generate or retrieve the key.
### 4 - Provider
The provider is the organization's name configured in A10 Control (default: **root**).
### 5 - SSL
Use SSL for connection (default: **Encrypted**).
{% hint style="info" %}
**Default Values**
* **Port**: 443
* **Provider**: root
* **SSL**: true
* **Timeout**: 30
{% endhint %}
{% hint style="danger" %}
**Attention**
Please perform a connection test to ensure there is a valid connection to the A10 Defend Orchestrator API. When the discovery operation is finalized you will be able to see the details on the Domain Inventory page.
{% endhint %}
# A10 Load Balancer
## Connection Requirements
{% stepper %}
{% step %}
### IP
IP address that you want to connect to.\
Requests will be sent to this address.
{% endstep %}
{% step %}
### Port
Port number (optional, default: **443**).
{% endstep %}
{% step %}
### Username
Username that will be used for the A10 Load Balancer.
You need an **API-enabled user account** that is already configured on the A10 Load Balancer appliance.
{% hint style="info" %}
🔵 **Required permissions**\
Ensure the supplied credentials have:
* `slb.virtual-server`
* `slb.service-group`
* `slb.server`
{% endhint %}
{% endstep %}
{% step %}
### Password
Password that will be used for the A10 Load Balancer.
{% endstep %}
{% step %}
### Is Secure?
Enable this option if the connection will be established over **HTTPS**.
{% endstep %}
{% step %}
### Timeout
Amount of time to wait for HTTP requests.
{% endstep %}
{% endstepper %}
{% hint style="warning" %}
⚠️ **Attention**\
Please perform a **connection test** to ensure there is a valid connection to the host.\
When the discovery operation is finalized, you will be able to see the details on the **Assets** page.
{% endhint %}
# Abnormal Security
## Connection Requirements
{% stepper %}
{% step %}
### URL
Abnormal URL (default: )
{% endstep %}
{% step %}
### Access Token
You can check this link to generate new Access Token:
{% endstep %}
{% step %}
### Fetch Employee Email Details
Fetch Employee Details from Email Address.
{% hint style="warning" %}
This option slows down the adapter's running speed
{% endhint %}
{% endstep %}
{% step %}
### Fetch Employee Identities Score
Fetch Employee Identities(Score) from Email Address
{% hint style="warning" %}
This option slows down the adapter's running speed
{% endhint %}
{% endstep %}
{% endstepper %}
{% hint style="warning" %}
⚠️ Attention\
Please perform a **connection test** to ensure there is a valid connection to the host.\
When the discovery operation is finalized, you will be able to see the details on the **Assets** page.
{% endhint %}
# Absolute
## Connection Requirements
{% stepper %}
{% step %}
### Domain
The domain of the Absolute server you want to connect to. Requests will be directed to this address.
{% hint style="info" %}
🔵 Default:
{% endhint %}
{% hint style="warning" %}
⚠️ The domain may change depending on the region where the server is located. For example, while the login URL might be , the API URL should use the corresponding api domain, like . You can enter the correct API URL by replacing the cc part with the appropriate api domain.
{% endhint %}
{% endstep %}
{% step %}
### Token ID
Token ID to authenticate against Absolute server.
{% endstep %}
{% step %}
### Token Secret
Token Secret (Secret Key) to authenticate against the Absolute server.
To get Token ID and Token Secret:
* Log in to the **Secure Endpoint Console** with a user that has **Manage permission** for API credentials.
* Click **Create API token**.
* In **Add title**, enter a name for your token.
* Select **Generate Token** under the Symmetric encryption section.
* Click on the **Expiration date** field and select an expiration date (at least one day in the future).
* Set the desired **Permissions**. You can use: **Select All** to grant all permissions assigned to your user role, or manually enable specific permissions like **View** or **Manage**.
* (Optional) Enter any allowed IP addresses to restrict API access. If none is set, all IPs are allowed.
* Click **Save** to generate the token.
* In the **Token Key Details** section:
* Click **Copy** next to the **Token ID** and save it securely.
* Click **Copy** next to the **Token Secret Key** and save it securely.
* Alternatively, click **Download Token** to save both values in a `.token` file.
* **Important:** If you close this dialog without copying or downloading the secret key, it cannot be retrieved again. You'll need to create a new token.
{% endstep %}
{% endstepper %}
{% hint style="warning" %}
⚠️ Please perform a **connection test** to ensure there is a valid connection to the host.\
When the discovery operation is finalized, you will be able to see the details on the **Assets** page.
{% endhint %}
# Acronis
## Connection Requirements
{% stepper %}
{% step %}
### IP
IP address that you want to connect to. Requests will be sent to this address.
{% endstep %}
{% step %}
### Port
Port number (optional, default: 443).
{% endstep %}
{% step %}
### Username
Username that will be used for the Acronis.
{% endstep %}
{% step %}
### Password
Password that will be used for the Acronis.
{% endstep %}
{% step %}
### Is Secure?
Enable this option if the connection will be established over HTTPS.
{% endstep %}
{% endstepper %}
{% hint style="warning" %}
⚠️ **Attention**\
Please perform a **connection test** to ensure there is a valid connection to the host.\
When the discovery operation is finalized, you will be able to see the details on the **Assets** page.
{% endhint %}
# Action1
## Connection Requirements
{% stepper %}
{% step %}
### Domain
The Domain of the Action 1.
> 🔵 **Default: api.action1.com**
> {% endstep %}
{% step %}
### Client ID
The Client ID of the Action 1 API.
{% endstep %}
{% step %}
### Client Secret
The Client Secret of the Action 1 API.
{% endstep %}
{% step %}
### Proxy
Proxy URL. (optional)
{% endstep %}
{% step %}
### Is Secure?
Enable this option if the connection will be established over HTTPS.
{% endstep %}
{% step %}
### Fetch Users
Fetching user inventory. (optional, default True)
{% endstep %}
{% endstepper %}
{% hint style="warning" %}
⚠️ **Attention**
Please perform a **connection test** to ensure there is a valid connection to the host.\
When the discovery operation is finalized, you will be able to see the details on the **Assets** page.
{% endhint %}
# Active Directory
## Connection Requirements
{% stepper %}
{% step %}
### IP Address or Hostname
Provide either the IP address or hostname of the Active Directory host. This is the server to which the connection will be established.
{% endstep %}
{% step %}
### Port
Specify the port number to use for the connection. This is optional; if no port is provided, the default `389` (used for LDAP) will be used.
{% endstep %}
{% step %}
### Username
Enter the username that will be used by the OctoXLabs CSAM PLATFORM to fetch data from Active Directory. Make sure this account has the necessary permissions.
{% hint style="info" %}
**"read-only"**\
The provided user account must have rights on the Active Directory in order to read device data without making changes.
{% endhint %}
{% endstep %}
{% step %}
### Password
Enter the password for the username specified above.
{% endstep %}
{% step %}
### Domain
Enter your organization’s fully qualified domain name (FQDN). This should be the domain where the Active Directory is located and will be used for authentication.
Example: if your FQDN is `octoxlabs.local.com`, the domain name could be `OCTOXLABS` when using only the domain name for authentication.
{% endstep %}
{% step %}
### Certificate File
Upload the Certificate Authority (CA) Root certificate here. This field is optional, but it is required if you plan to establish a secure LDAPS (LDAP over SSL) connection.
{% hint style="info" %}
**Note**\
You can export the Certificate Authority (CA) Root certificate by following this guide .
{% endhint %}
{% endstep %}
{% step %}
### Timeout
Define the maximum duration, in seconds, before the connection is automatically closed if there is no response. This field is optional and defaults to `30` seconds. Adjust this value if your network or server configuration requires a longer timeout period.
{% endstep %}
{% step %}
### Use Only Domain Name for Authentication
Choose whether to use only the domain name (without the full FQDN) for LDAP authentication. For example, if your FQDN is `octoxlabs.local.com`, you would use `OCTOXLABS` as the domain name.
{% endstep %}
{% step %}
### Use Simple Authentication
NTLM authentication is used by default. If you prefer to use Simple authentication (for LDAP configurations that do not support NTLM), you may enable this option.
{% endstep %}
{% step %}
### SSL
Select whether to use SSL for a secure connection. This is optional; if not specified, the connection will default to unencrypted.
{% endstep %}
{% step %}
### Fetch Users
Choose whether to retrieve user information from the Active Directory domain. This is an optional setting and is enabled by default.
{% endstep %}
{% endstepper %}
{% hint style="info" %}
Ensure the following ports are open for communication between the OctoXLabs Asset host and the Active Directory host:
* TCP/UDP port `389` for LDAP connections.
* TCP/UDP port `636` for LDAPS connections.
{% endhint %}
{% hint style="warning" %}
**Attention**\
Please perform a **connection test** to ensure there is a valid connection to the host.\
When the discovery operation is finalized, you will be able to see the details on the **Assets** page.
{% endhint %}
# ActivTrak
## Connection Requirements
### 1 - Domain
Domain of the ActivTrak host. (default: **api.activtrak.com**)
### 2 - API Key
API keys may be created by your ActivTrak administrator from the ActivTrak app.
* Within the navigation, select API & Integrations > API Keys
* Click Create API Key
* Follow the steps to request a new API key. After you submit the request, you will see the API key details.
### 3 - Is Secure?
Choose this if your connection is going to be over HTTPS (optional, default: **True**).
### 4 - Timeout
The amount of time (in seconds) to wait for API responses. (default: 30)
{% hint style="danger" %}
**Attention**
Please perform a connection test to ensure there is a valid connection to the ActivTrak host. When the discovery operation is finalized you will be able to see the details on Assets page.
{% endhint %}
# ActZero
## Connection Requirements
{% stepper %}
{% step %}
### Domain
Domain of the ActZero host. (default: `api.actzero.ai`)
{% endstep %}
{% step %}
### Api key
An API Key associated with a user account that has permissions to fetch assets. Generate it in the ActZero Customer Portal. If you don’t see an “API Keys / API Access” or similar section, your tenant likely needs API access enabled—ask your ActZero admin or support to enable it for your account.
{% endstep %}
{% step %}
### Is Secure?
Enable this option if the connection will be established over HTTPS.
{% endstep %}
{% endstepper %}
{% hint style="warning" %}
⚠️ Attention\
Please perform a **connection test** to ensure there is a valid connection to the host.\
When the discovery operation is finalized, you will be able to see the details on the **Assets** page.
{% endhint %}
# Admin By Request
## Connection Requirements
{% stepper %}
{% step %}
### Domain
Enter the domain of your Admin by Request instance. This is the URL where the service is hosted.
{% hint style="info" %}
🔵 `dc1api.adminbyrequest.com`\
For most users, the default domain is `dc1api.adminbyrequest.com`.
{% endhint %}
{% endstep %}
{% step %}
### Token
You need to generate an API token to establish a connection. Follow these steps to create a Token:
* Log in to your Admin by Request portal account.
* From the Admin By Request Settings menu, select the API Access tab.
* Copy the generated token and save it for future use.
{% endstep %}
{% step %}
### SSL
Choose whether to use SSL for a secure connection. This is optional, but by default, connections are encrypted.
{% endstep %}
{% endstepper %}
{% hint style="warning" %}
⚠️ Attention\
Please perform a **connection test** to ensure there is a valid connection to the host.\
When the discovery operation is finalized, you will be able to see the details on the **Assets** page.
{% endhint %}
# Acunetix
## Connection Requirements
{% stepper %}
{% step %}
### IP
IP address of the Acunetix host.
{% endstep %}
{% step %}
### Port
Port number (optional, default: 443).
{% endstep %}
{% step %}
### Username & API Token
The credentials which will be used by OctoXLabs CSAM PLATFORM Asset to fetch data from Acunetix.
> The value supplied in Username and API Token must be associated with credentials that have permissions to read-only list of , Members and System . You can find your api token account page.
> {% endstep %}
{% step %}
### SSL
Use SSL for connection (optional, default: Encrypted).
{% endstep %}
{% endstepper %}
{% hint style="warning" %}
⚠️ Attention
Please perform a **connection test** to ensure there is a valid connection to the host.\
When the discovery operation is finalized, you will be able to see the details on the **Assets** page.
{% endhint %}
# Addigy
{% stepper %}
{% step %}
### Domain
Enter the domain of your Addigy instance. This specifies the address where the platform is hosted.
{% hint style="info" %}
🔵 **prod.addigy.com**\
Typically, for most users, the default domain is .
{% endhint %}
{% endstep %}
{% step %}
### Client ID and Client Secret
To establish a connection, you will need a Client ID and Client Secret from the Addigy platform. Follow these steps to create them:
* Go to the Account > Integrations section from the left-side navigation menu in Addigy.
* Click on the +API button to create a new API integration.
* Provide a meaningful name for this API integration (e.g., OctoXLabs Integration) and click Save.
* A window will display the newly generated Client ID and Client Secret.
* Make sure to save these credentials as they will be needed for authentication.
> 🔵 **"Read-only"**\
> Ensure the supplied Client ID has permissions in order to fetch assets.
> {% endstep %}
> {% endstepper %}
{% hint style="warning" %}
⚠️ **Attention**\
Please perform a **connection test** to ensure there is a valid connection to the host.\
When the discovery operation is finalized, you will be able to see the details on the **Assets** page.
{% endhint %}
# Akamai
## Connection Requirements
### 1 - Host URL
The Akamai API URL usually follows the format: `https://akab-*.luna.akamaiapis.net` You can find this in your Akamai Control Center under Identity & Access Management.
### 2 - API Credentials
You need to create an API client in Akamai Control Center with default access to:
* DNS / Zones: Read-Only or Read-Write
This will generate the following credentials required for connection:
* **Client Token**
* **Client Secret**
* **Access Token**
### 3 - Timeout
The amount of time (in seconds) to wait for API responses. (default: **30**)
### 4 - Is Secure?
Choose this if your connection is going to be over HTTPS (optional, default: **True**).
### 5 - Thread Count
Number of parallel threads for sending API requests (default: **16**).
### 6 - Sleep Time
Number of seconds to wait between requests (default: **0**).
{% hint style="danger" %}
**Attention**
Please perform a connection test to ensure there is a valid connection to the Akamai API. When the discovery operation is finalized you will be able to see the details on Assets page.
{% endhint %}
# Akamai Enterprise Application Access
## Connection Requirements
To obtain your API credentials, navigate to **Identity and Access Management** in Akamai Control Center and click **Create API client**. Click **Quick** and then **Download** under Credentials. This downloads an `.edgerc` file containing all four credential values below.
The file looks like this:
```
[default]
client_secret = C113nt53KR3TN6N90yVuAgICxIRwsObLi0E67/N8eRN=
host = akab-h05tnam3wl42son7nktnlnnx-kbob3i3v.luna.akamaiapis.net
access_token = akab-acc35t0k3nodujqunph3w7hzp7-gtm6ij
client_token = akab-c113ntt0k3n4qtari252bfxxbsl-yvsdj
```
### 1 - Host
The `host` value from your `.edgerc` file.
### 2 - Client Token
The `client_token` value from your `.edgerc` file.
### 3 - Access Token
The `access_token` value from your `.edgerc` file.
### 4 - Client Secret
The `client_secret` value from your `.edgerc` file.
### 5 - Contract ID
Your Akamai contract identifier. Contact your Akamai account team if you are unsure of your contract ID.
### 6 - Is Secure?
Choose this if your connection is going to be over HTTPS (optional, default: **True**).
### 7 - Thread Count
Number of parallel threads for sending API requests (default: **16**).
### 8 - Sleep Time
Delay in seconds between thread starts. Increase this if you encounter rate limiting during user collection (default: **0**).
### 9 - Proxy
Proxy URL (optional).
### 10 - Timeout
The amount of time (in seconds) to wait for API responses. (default: **30**)
{% hint style="danger" %}
**Attention**
Please perform a connection test to ensure there is a valid connection to the Akamai Enterprise Application Access host. When the discovery operation is finalized you will be able to see the details on Assets page.
{% endhint %}
# Akamai Identity and Access Management
## Connection Requirements
To obtain your API credentials, navigate to **Identity and Access Management** in Akamai Control Center and click **Create API client**. Click **Quick** and then **Download** under Credentials. This downloads an `.edgerc` file containing all four credential values below.
The file looks like this:
```
[default]
client_secret = C113nt53KR3TN6N90yVuAgICxIRwsObLi0E67/N8eRN=
host = akab-h05tnam3wl42son7nktnlnnx-kbob3i3v.luna.akamaiapis.net
access_token = akab-acc35t0k3nodujqunph3w7hzp7-gtm6ij
client_token = akab-c113ntt0k3n4qtari252bfxxbsl-yvsdj
```
### 1 - Host
The `host` value from your `.edgerc` file.
### 2 - Client Token
The `client_token` value from your `.edgerc` file.
### 3 - Access Token
The `access_token` value from your `.edgerc` file.
### 4 - Client Secret
The `client_secret` value from your `.edgerc` file.
### 5 - Is Secure?
Choose this if your connection is going to be over HTTPS (optional, default: **True**).
### 6 - Fetch Multi Account
Enable this option to collect users across all Akamai accounts accessible to your API client. When enabled, the connector fetches account switch keys and queries each account separately (default: **False**).
### 7 - Proxy
Proxy URL (optional).
### 8 - Timeout
The amount of time (in seconds) to wait for API responses. (default: **30**)
{% hint style="danger" %}
**Permissions Required**
When creating the API client, choose the API service named **Identity Management: User Administration** and set the access level to **ADMIN**. First-time users need to create an API client with access to this API through the Identity Management application in Akamai Control Center. Alternatively, administrators can create an API client on behalf of the user. Then, the user can generate credentials through the Identity Management application.
{% endhint %}
{% hint style="danger" %}
**Attention**
Please perform a connection test to ensure there is a valid connection to the Akamai Identity and Access Management host. When the discovery operation is finalized you will be able to see the details on the Assets page.
{% endhint %}
# Amplitude
## Connection Requirements
* **IP**\
IP address for Amplitude-SCIM (default: `core.amplitude.com`).
* **Port**\
Port number (optional, default: `443`).
* **API Key**\
Enter the API key obtained from Amplitude. You can obtain the API key from the "Organization Settings / API Keys" page in the product.
* **Is Secure**\
Use SSL for connection or not.
{% hint style="warning" %}
⚠️ **Attention**\
Please perform a **connection test** to ensure there is a valid connection to the host.\
When the discovery operation is finalized, you will be able to see the details on the **Assets** page.
{% endhint %}
# Aha!
## Connection Requirements
{% stepper %}
{% step %}
### IP
IP address of the Aha! host.
{% endstep %}
{% step %}
### Port
Port number (optional, default: 443).
{% endstep %}
{% step %}
### API Key
API key that will be used for the authorizing api requests.
{% hint style="info" %}
🔵 **Users**\
The value supplied in API Key can be generated from user interface. Key should have read permissions for
{% endhint %}
{% endstep %}
{% step %}
### SSL
Use SSL for connection (optional, default: Encrypted).
{% endstep %}
{% endstepper %}
***
{% hint style="warning" %}
⚠️ **Attention**\
Please perform a **connection test** to ensure there is a valid connection to the host.\
When the discovery operation is finalized, you will be able to see the details on the **Assets** page.
{% endhint %}
# Aircall
## Connection Requirements
{% stepper %}
{% step %}
### Domain
The Domain of the Aircall.
> 🔵 **Default:** `api.aircall.io`
> {% endstep %}
{% step %}
### API ID & API Token
To access the Aircall Public API, you'll need an API ID and an API Token.
Navigate to your Company's Settings page, locate the "API Keys" section, and click "Add a new API key" to reveal these credentials.
It's crucial to immediately copy and securely save your API Token, as Aircall does not store it in plain text and it cannot be retrieved later if lost.
{% endstep %}
{% step %}
### Proxy
Proxy URL. (optional)
{% endstep %}
{% step %}
### Is Secure?
Enable this option if the connection will be established over HTTPS.
{% endstep %}
{% endstepper %}
{% hint style="warning" %}
⚠️ Attention
Please perform a **connection test** to ensure there is a valid connection to the host.
When the discovery operation is finalized, you will be able to see the details on the **Assets** page.
{% endhint %}
# Arista Cloudvision AGNI
## Connection Requirements
{% stepper %}
{% step %}
### IP
Enter the IP address of your Arista Cloudvision AGNI instance.
{% endstep %}
{% step %}
### Port
Specify the port number for the connection. This field is optional and defaults to **443**.
{% endstep %}
{% step %}
### API Token
You will need to generate an **API token** to authenticate the connection. From Launchpad API Keys Access Wireless launchpad UI-> Admin-> Keys
{% endstep %}
{% step %}
### Is Secure
Choose this if your connection is going to be over HTTPS.
{% endstep %}
{% endstepper %}
{% hint style="warning" %}
It is crucial to perform a connection test to verify that a valid connection to the Arista Cloudvision AGNI host is established. Once the discovery process is complete, the connection details will be displayed on the Device Inventory page.
{% endhint %}
# Airtable Enterprise
## Connection Requirements
### 1 - Domain
The domain of the Airtable Enterprise instance.
{% hint style="info" %}
**Default: api.airtable.com**
{% endhint %}
### 2 - API Token
The API Token of the Airtable Enterprise API.
**To get API Token for Airtable Enterprise API:**
{% hint style="info" %}
1. From [/create/tokens](https://airtable.com/create/tokens), click the “Create new token” button to create a new personal access token.
2. Give your token a unique name. This name will be visible in record revision history.
3. Choose the scopes to grant to your token. This controls what API endpoints the token will be able to use.
4. Click ‘add a base’ to grant the token access to a base or workspace.
5. Once your token is created, we will only show it to you once, so we encourage you to copy it to your clipboard and store it somewhere safe.
{% endhint %}
{% hint style="danger" %}
**User Role and Token Scope**
You need the Enterprise Admin role for this integration, and the token must include at least the enterprise.user:read scope.
{% endhint %}
### 3 - Enterprise Account ID
The Enterprise Account ID of the Airtable Enterprise account.
{% hint style="info" %}
You can find your Airtable Enterprise account ID in the admin panel under the "Account ID" information, which is available to enterprise administrators.
{% endhint %}
### 4 - Is Secure?
Choose this if your connection is going to be over HTTPS (optional, default: **True**).
### 5 - Timeout
The amount of time (in seconds) to wait for API responses. (default: 30)
### 6 - Proxy
Proxy URL (optional).
{% hint style="danger" %}
**Attention**
Please perform a connection test to ensure there is a valid connection to the Airtable Enterprise host. When the discovery operation is finalized you will be able to see the details on Assets page.
{% endhint %}
# Apache Cloud Stack
## Connection Requirements
{% stepper %}
{% step %}
### IP
Enter the IP address of your Apache Cloudstack instance.
{% endstep %}
{% step %}
### Port
Specify the port number for the connection. This field is optional and defaults to 8080.
{% endstep %}
{% step %}
### API Key and Secret Key
You will need to generate an API Key and Secret Key to authenticate the connection. Follow these steps to create them:
* Log in to Apache Cloudstack as the "admin" user.
* Navigate to the Accounts section.
* Select a user within the account and click on View User.
* Click on Generate Key and copy both the API Key and Secret Key.
{% endstep %}
{% step %}
### Proxy
Proxy URL (optional).
{% endstep %}
{% step %}
### SSL
Choose whether to use SSL for secure connections. By default, the connection is unencrypted, but you can enable SSL for added security.
{% endstep %}
{% endstepper %}
{% hint style="warning" %}
⚠️ **Attention**
Please perform a **connection test** to ensure there is a valid connection to the host. When the discovery operation is finalized, you will be able to see the details on the **Assets** page.
{% endhint %}
# Apple App Store Connect
## Connection Requirements
### 1 - Domain
The domain of the Apple App Store Connect instance.
{% hint style="info" %}
**Default:**
{% endhint %}
### 2 - Key ID
Your private key ID from App Store Connect, for example, **2X9R4HXF34**.
**For Team API Key:**
Log in to App Store Connect and navigate to **Users and Access**. Select the **Integrations** tab. The Key IDs appear in a column under the **Active** heading. Hover the cursor next to a key ID to display the **Copy Key ID** link, then click it to copy the value.
**For Individual API Key:**
Log in to App Store Connect and go to your **User Profile**. Scroll down to the **Individual API Key** section and click **Generate API Key**. After generating the key, the Key ID will be displayed and can be copied from there.
### 3 - Private Key
The private key associated with the API key.
To obtain the private key, go to **Users and Access → Keys** in the App Store Connect portal and create a new API key. When the key is generated, download the **.p8** file and copy the entire contents of the file into this field.
### 4 - Issuer ID
Your issuer ID from the API Keys page in App Store Connect, for example, **57246542-96fe-1a63-e053-0824d011072a**.
This value is only required when using **Team API Keys**. It identifies your App Store Connect organization when generating authentication tokens.
You can find this value in the Apple App Store Connect portal by navigating to: **Users and Access → Integrations**. The **Issuer ID** is displayed at the top of the page.
### 5 - Proxy URL
Proxy url. (optional)
### 6 - Is Secure?
Choose this if your connection is going to be over HTTPS (optional, default: **True**).
### 7 - Timeout
The amount of time (in seconds) to wait for API responses. (default: 30)
{% hint style="danger" %}
**Attention**
Please perform a connection test to ensure there is a valid connection to the Apple App Store Connect host. When the discovery operation is finalized you will be able to see the details on Assets page.
{% endhint %}
# Apple Business Manager
## Connection Requirements
### 1 - Domain
The API domain for Apple Business Manager.
{% hint style="info" %}
**Default: api-business.apple.com**
{% endhint %}
### 2 - Client ID
The client ID received when uploading your public key to Apple Business Manager. This value is prefixed with `BUSINESSAPI.` followed by a UUID.
### 3 - Team ID
Your organization identifier in Apple Business Manager. This value is also prefixed with `BUSINESSAPI.` followed by a UUID.
### 4 - Key ID
The UUID identifier for the public key you uploaded to Apple Business Manager.
### 5 - Private Key
The ES256 (P-256 elliptic curve) private key in PEM format. This is the private key corresponding to the public key you uploaded to Apple Business Manager.
{% hint style="info" %}
**Key Generation**
Generate an ES256 key pair and upload the public key to Apple Business Manager under **Settings > API Keys**.
{% endhint %}
### 6 - Proxy
Proxy url. (optional)
### 7 - Timeout
The amount of time (in seconds) to wait for API responses. (default: 30)
{% hint style="danger" %}
**Attention**
Please perform a connection test to ensure there is a valid connection to the Apple Business Manager API. When the discovery operation is finalized you will be able to see the details on Assets page.
{% endhint %}
# Apple Device Management
## Connection Requirements
### 1 - Domain
The hostname of the Apple DEP enrollment service.
{% hint style="info" %}
Default: **mdmenrollment.apple.com**
{% endhint %}
### 2 - Obtaining Credentials
To obtain the required credentials, follow these steps:
1. Generate an RSA key pair: `openssl req -x509 -newkey rsa:2048 -keyout key.pem -out cert.pem -days 365`
2. Sign in to Apple Business Manager, go to Settings, then MDM Servers.
3. Select an existing MDM server or click Add MDM Server, and upload the **cert.pem** file.
4. Download the Token file (.p7) and decrypt it with your private key: `openssl smime -decrypt -inform smime -in fileFromApple.p7 -inkey key.pem`
5. The decrypted file contains four values needed below: consumer\_key, consumer\_secret, access\_token, and access\_secret.
### 3 - Consumer Key
The OAuth consumer key from the decrypted token file. Prefixed with **CK\_**.
### 4 - Consumer Secret
The OAuth consumer secret from the decrypted token file. Prefixed with **CS\_**.
### 5 - Access Token
The OAuth access token from the decrypted token file. Prefixed with **AT\_**.
### 6 - Access Secret
The OAuth access secret from the decrypted token file. Prefixed with **AS\_**.
### 7 - Proxy
Proxy url. (optional)
### 8 - Timeout
The amount of time (in seconds) to wait for API responses. (default: 30)
{% hint style="danger" %}
**Attention**
This adapter fetches devices that are unassigned to an MDM. To fetch MDM-managed devices, use the respective adapter for your MDM solution (JAMF, Intune, etc.). Please perform a connection test to ensure there is a valid connection to the Apple Device Management service.
{% endhint %}
# AppViewX CertPlus
## Connection Requirements
{% stepper %}
{% step %}
### Hostname or IP
The hostname or IP address of the AppViewX CERT+. (default: system.AppViewXCertPlus.com)
{% endstep %}
{% step %}
### Port
Port number (default: 31443).
{% endstep %}
{% step %}
### Client ID and Client Secret
Service Account Login Client ID and Secret. (For more information check out this link)
{% endstep %}
{% step %}
### Gateway (gw) Source
Source from which the request is triggered. (default: external)
{% endstep %}
{% step %}
### SSL
Use SSL for connection (default: Encrypted).
{% endstep %}
{% endstepper %}
{% hint style="warning" %}
Please perform a **connection test** to ensure there is a valid connection to the host.\
When the discovery operation is finalized, you will be able to see the details on the **Assets** page.
{% endhint %}
# Aruba ClearPass
## Connection Requirements
{% stepper %}
{% step %}
### IP
Enter the IP address of your Aruba ClearPass instance.
{% endstep %}
{% step %}
### Port
Specify the port number for the connection. This field is optional and defaults to 8080.
{% endstep %}
{% step %}
### Client ID and Client Secret
You will need to generate an API Key and Secret Key to authenticate the connection. Follow these steps to create them:
* Log in to Aruba ClearPass as the "admin" user.
* Navigate to the Administration -> API Services -> API Clients section.
* Create a client with ClearPass REST API operation mode, IT Administrators as operator profile and Client Credentials as grant type. You may choose access token lifetime as you wish. We're recommending as 1 hours
* Copy your Client ID and Client Secret.
{% endstep %}
{% step %}
### SSL
Choose whether to use SSL for secure connections. By default, the connection is unencrypted, but you can enable SSL for added security.
{% endstep %}
{% step %}
### Fetch Users
Fetching user information is optional. (default False)
{% endstep %}
{% step %}
### Per Page
Amount of devices going to be fetched per request. (default: 500, min: 1, max: 1000)
{% endstep %}
{% step %}
### Sleep Time
Number of seconds to be waited during construction of parallel threads. By increasing the time on here, it will lower the resource consumption while increasing discovery time.
{% endstep %}
{% step %}
### Thread Count
This adapter works in a multi threaded manner. This field represents the number of parallel threads that will be constructed for sending API requests (default: 16, min: 1, max: 32)
{% endstep %}
{% endstepper %}
{% hint style="warning" %}
⚠️ Attention
Having too many parallel threads will consume significantly more resources and may cause increased network load. If resource consumption is a concern, we recommend using fewer threads. However, be aware that reducing thread count will increase discovery time since it will send lesser number of requests. When the discovery operation is finalized, you will be able to see the details on the **Assets** page.
{% endhint %}
{% hint style="warning" %}
⚠️ Attention
Please perform a **connection test** to ensure there is a valid connection to the host. When the discovery operation is finalized, you will be able to see the details on the **Assets** page.
{% endhint %}
# Asset Panda
{% stepper %}
{% step %}
### Domain
Enter the domain of your Asset Panda instance. This specifies the address where the platform is hosted.
> 🔵 **api.assetpanda.com**\
> Typically, for most users, the default domain is .
> {% endstep %}
{% step %}
### Email
Email address you would use to log into your account when going to the Asset Panda web application on the website.
{% endstep %}
{% step %}
### Password
The Password for the email.
{% endstep %}
{% endstepper %}
{% hint style="warning" %}
Please perform a **connection test** to ensure there is a valid connection to the host.\
When the discovery operation is finalized, you will be able to see the details on the **Assets** page.
{% endhint %}
# Asgard Asset Management
## Connection Requirements
{% stepper %}
{% step %}
### IP
Enter the IP address of your Asgard Asset Management instance.
{% endstep %}
{% step %}
### Port
Specify the port number for the connection. This field is optional and defaults to 8443.
{% endstep %}
{% step %}
### API Key
You need an API key to access the ASGARD Management Center API. Your API key can be generated in **User Settings > API Key.**
{% hint style="warning" %}
Your API key has the same rights as your user. If you want an API key with restricted permissions, create another user with restricted permissions and use their API key.
{% endhint %}
{% endstep %}
{% step %}
### Fetch Installed Software
Choose if you'd like to fetch installed software information (default: True).
{% endstep %}
{% step %}
### Is Secure?
Enable this option if the connection will be established over **HTTPS**.
{% endstep %}
{% endstepper %}
{% hint style="warning" %}
Please perform a **connection test** to ensure there is a valid connection to the host.\
When the discovery operation is finalized, you will be able to see the details on the **Assets** page.
{% endhint %}
# Asana
{% stepper %}
{% step %}
### Domain
The domain of the Asana server you want to connect to. Requests will be directed to this address.
{% hint style="info" %}
Default: `app.asana.com`
{% endhint %}
{% endstep %}
{% step %}
### Personal Access Token (PAT)
Ensure you have a Personal Access Token (PAT) for Asana with sufficient permissions for the intended API calls (e.g., reading or modifying user and project data).
{% stepper %}
{% step %}
#### PAT Generation — Step 1
Go to the Asana Developer Console:
{% endstep %}
{% step %}
#### PAT Generation — Step 2
In the **My Apps** section, scroll down to **Personal Access Tokens**.
{% endstep %}
{% step %}
#### PAT Generation — Step 3
Click **"Create new token"**.
{% endstep %}
{% step %}
#### PAT Generation — Step 4
Enter a name or description for your token (e.g. "Integration Script").
{% endstep %}
{% step %}
#### PAT Generation — Step 5
Click **"Create token"** to generate it.
{% endstep %}
{% step %}
#### PAT Generation — Step 6
You will now see your newly generated PAT. Save this token securely — once you leave the page, you won’t be able to view it again.
{% endstep %}
{% endstepper %}
{% hint style="warning" %}
Ensure your PAT has sufficient permissions for the API operations you plan to perform.
{% endhint %}
{% endstep %}
{% step %}
### Workspace/Organization ID
Globally unique identifier for your workspace or organization.
{% endstep %}
{% step %}
### Proxy URL
Proxy URL. (optional)
{% endstep %}
{% step %}
### Is Secure?
Choose this if your connection is going to be over HTTPS.
{% endstep %}
{% endstepper %}
{% hint style="danger" %}
Attention: Please perform a connection test to ensure there is a valid connection to the Asana host. When the discovery operation is finalized, you will be able to see the details on the Assets page.
{% endhint %}
# Assure1 By Federos
{% stepper %}
{% step %}
### URL
Enter the URL of your Assure1 by Federos instance.
> 🔵 **https\://{ip}:{port}**\
> The URL should follow this format:
> {% endstep %}
{% step %}
### Username
Provide the username that OctoXLabs CSAM Platform will use to access Assure1 by Federos and fetch data.
> 🔵 **"operator"**\
> Make sure that the user account has either the or "api" roles for proper access.
> {% endstep %}
{% step %}
### Password
Enter the password associated with the provided username to authenticate the connection.
{% endstep %}
{% endstepper %}
{% hint style="warning" %}
⚠️ **Attention**\
Please perform a **connection test** to ensure there is a valid connection to the host.\
When the discovery operation is finalized, you will be able to see the details on the **Assets** page.
{% endhint %}
# Atera
## Connection Requirements
{% stepper %}
{% step %}
### URL
The Domain of the Atera.
{% hint style="info" %}
🔵 Default: app.atera.com
{% endhint %}
{% endstep %}
{% step %}
### API Key
Generating API Key:
* Log in to your Atera Console.
* From Admin, on the side panel, click API.
* Click the eye icon to reveal your API key.
{% endstep %}
{% endstepper %}
{% hint style="warning" %}
⚠️ Attention\
Please perform a **connection test** to ensure there is a valid connection to the host.\
When the discovery operation is finalized, you will be able to see the details on the **Assets** page.
{% endhint %}
# Attivo Decoy
## Connection Requirements
{% stepper %}
{% step %}
### IP Address
Provide the IP address of the Attivo Networks Decoy host that will be used to establish a connection.
{% endstep %}
{% step %}
### Username
Enter the username that OctoXLabs CSAM Platform will use to access and fetch data from the Attivo Networks Decoy.
{% hint style="info" %}
"REST API"\
The user must have access to enable data retrieval from the system. To create a user with only API access:
* Go to Administration and navigate to User Accounts | Configuration to open the "Configure users" page.
* Click the Add button to open the "User add" page.
* Choose REST API as the Access type, fill in the necessary details, and then click the Save button to complete.
{% endhint %}
{% endstep %}
{% step %}
### Password
Provide the password associated with the specified username to authenticate the connection.
{% endstep %}
{% step %}
### Port
Specify the port number for the connection. This is optional; the default port is 8443.
{% endstep %}
{% step %}
### SSL
Select whether to use SSL for the connection. By default, SSL encryption is enabled.
{% endstep %}
{% endstepper %}
{% hint style="warning" %}
Please perform a connection test to ensure there is a valid connection to the host.\
When the discovery operation is finalized, you will be able to see the details on the **Assets** page.
{% endhint %}
# Atlassian Confluence Cloud
## Connection Requirements
### 1 - Site Name
The subdomain of your Atlassian site. For example, if your Confluence URL is ****, enter **mycompany**.
### 2 - Email
The email address associated with your Atlassian account.
### 3 - API Token
An API token generated from your Atlassian account. Tokens can be created at ****. To generate an API Token, click on Create API token. Choose a label that is short, memorable, and easy to remember, and click Create. Copy the generated API token.
### 4 - Proxy
Proxy URL (optional).
### 5 - Timeout
The amount of time (in seconds) to wait for API responses. (default: 30)
{% hint style="danger" %}
**Permissions Required**
The Atlassian account must have user read access on the Confluence site. Only human user accounts (**accountType: atlassian**) are collected; bot and service accounts are excluded automatically.
{% endhint %}
# Atlassian Confluence On-Prem
## Connection Requirements
### 1 - IP
The IP address or hostname of your Confluence Server or Data Center instance.
### 2 - Port
Port number (optional, default: **8090**).
### 3 - Username
The username of your Atlassian Confluence account.
### 4 - Password
The password for your Atlassian Confluence account.
### 5 - Is Secure?
Choose this if your connection is going to be over HTTPS (optional, default: **True**).
### 6 - Proxy
Proxy url. (optional)
### 7 - Timeout
The amount of time (in seconds) to wait for API responses. (default: 30)
{% hint style="info" %}
**Default Values**
* **Port**: 8090
* **Is Secure**: true
* **Timeout**: 30
{% endhint %}
{% hint style="danger" %}
**Attention**
Please perform a connection test to ensure there is a valid connection to the Atlassian Confluence On-Prem host. When the discovery operation is finalized you will be able to see the details on Assets page.
{% endhint %}
# Atlassian Crowd
## Connection Requirements
### 1 - Domain
The domain of the Atlassian Crowd host.
### 2 - Application Name
The name of the application registered in Crowd.
### 3 - Application Password
The password set for the registered application in Crowd.
### 4 - Is Secure
Choose this if your connection is going to be over HTTPS (optional, default: **True**).
### 5 - Proxy
Proxy URL (optional).
### 6 - Timeout
The amount of time (in seconds) to wait for API responses. (default: 30)
{% hint style="info" %}
**Default Values**
* **Is Secure**: true (HTTPS)
* **Timeout**: 30 seconds
{% endhint %}
{% hint style="danger" %}
**Attention**
Please perform a connection test to ensure there is a valid connection to the Atlassian Crowd host. When the discovery operation is finalized you will be able to see the details on Assets page.
{% endhint %}
# Atlassian Guard
## Connection Requirements
### 1 - Directory ID
The SCIM directory ID from the Directory base URL. For instance, if the Directory base URL is ****, the Directory ID is **abcdeg1234**.
### 2 - API Token
The SCIM API key used for Bearer authentication. It grants the adapter read-only access to synchronize user data from your Atlassian organization.
### 3 - HTTPS Proxy
Proxy URL (optional).
### How to Obtain Directory ID and API Token
1. Go to **admin.atlassian.com** and select your organization.
2. From the top menu, navigate to **Security**, then select **Identity providers** from the left-hand panel.
3. Choose the relevant Directory.
4. Click the **three dots menu** located under the User Provisioning section (bottom right-hand side).
5. Select **Regenerate API key**.
6. Select **Regenerate key**.
7. Copy the value of **Directory base URL** and the **API key** and keep them in a safe place. They will not be shown again.
8. Click **Done** to end the process.
### 4 - Timeout
The amount of time (in seconds) to wait for API responses. (default: 30)
{% hint style="info" %}
**Default Values**
* **Timeout**: 30 seconds
{% endhint %}
{% hint style="danger" %}
**Permissions Required**
The API key must be generated by an Atlassian Guard organization admin. The token is scoped to the SCIM directory it was created for and provides read access to all user accounts managed within that directory.
{% endhint %}
# Automox
## Connection Requirements
{% stepper %}
{% step %}
### Https Proxy
Https Proxy url. (optional)
{% endstep %}
{% endstepper %}
{% hint style="warning" %}
⚠️ **Attention**\
Please perform a **connection test** to ensure there is a valid connection to the host.\
When the discovery operation is finalized, you will be able to see the details on the **Assets** page.
{% endhint %}
# Automic
## Connection Requirements
{% stepper %}
{% step %}
### Host
Hostname or IP address on which the JCP is currently running.
{% endstep %}
{% step %}
### Port
Connection port. Broadcom Automic uses the port of the JCP as configured in the REST section of `ucsrv.ini`.
{% endstep %}
{% step %}
### Client ID
Client ID of the Broadcom Automic user.
{% endstep %}
{% step %}
### Username
Username of the Broadcom Automic user.
{% endstep %}
{% step %}
### Password
Password of the Broadcom Automic user.
{% endstep %}
{% step %}
### Is Secure?
Enable this option if the connection will be established over HTTPS.
{% endstep %}
{% endstepper %}
{% hint style="warning" %}
⚠️ **Attention**
Please perform a **connection test** to ensure there is a valid connection to the host. When the discovery operation is finalized, you will be able to see the details on the **Assets** page.
{% endhint %}
# Attivo Endpoint
## Connection Requirements
{% stepper %}
{% step %}
### IP
IP address of the Attivo Networks Endpoints host.
{% endstep %}
{% step %}
### Username
The username which is going to be used by OctoXLabs CSAM PLATFORM Asset to fetch data from Attivo Networks Endpoints. The user needs to have "Rest API" Account Type on Attivo Networks Endpoints to read device data.
{% hint style="info" %}
You can follow the steps below to create a user.
To create a user with only API access:
* Click Administration and navigate to User Accounts | Configuration. Configure users page is displayed.
* Click the Add button. User add page is displayed.
* Select the Access type as REST API. Enter the details in the remaining fields and click Save button.
{% endhint %}
{% endstep %}
{% step %}
### Password
The Password of the provided username.
{% endstep %}
{% step %}
### Port
Port number (optional, default: 8443).
{% endstep %}
{% step %}
### SSL
Use SSL for connection (optional, default: Encrypted).
{% endstep %}
{% endstepper %}
{% hint style="warning" %}
Please perform a connection test to ensure there is a valid connection to the host.
When the discovery operation is finalized, you will be able to see the details on the Assets page.
{% endhint %}
# Auvik
## Connection Requirements
{% stepper %}
{% step %}
### Domain
The Domain address the Auvik-Network server you want to connect to. Requests will be directed to this address. (optional, default: auvikapi.us1.my.auvik.com)
{% endstep %}
{% step %}
### User Name
Enter your username for authentication.
{% endstep %}
{% step %}
### API Key
Enter the API key obtained from Auvik. You can obtain the API key from the "Log in to your Auvik account / API Keys" page in the product.
{% hint style="info" %}
To access and perform operations on resources via the REST API, an API Key must be generated.
{% endhint %}
{% endstep %}
{% endstepper %}
{% hint style="warning" %}
Please perform a connection test to ensure there is a valid connection to the host.\
When the discovery operation is finalized, you will be able to see the details on the Assets page.
{% endhint %}
# AWS Sagemaker
## Connection Requirements
{% stepper %}
{% step %}
### Access Key ID
Enter your AWS Access Key ID.
🔵 **Example:** [Learn how to retrieve Access Key ID](https://docs.aws.amazon.com/IAM/latest/UserGuide/id_credentials_access-keys.html)
{% endstep %}
{% step %}
### Secret Access Key
Enter your AWS Secret Access Key.
🔵 **Example:** [Learn how to retrieve Secret Access Key](https://docs.aws.amazon.com/IAM/latest/UserGuide/id_credentials_access-keys.html)
{% endstep %}
{% step %}
### Region
Enter the AWS region where your SageMaker models/endpoints are deployed.
🔵 **Example:** eu-north-1
{% endstep %}
{% step %}
### Proxy
Proxy URL (optional)
{% endstep %}
{% endstepper %}
{% hint style="warning" %}
Please ensure the provided credentials and region information are correct. Connection tests will verify the validity of the credentials. Once the operation completes, discovered SageMaker endpoints and models will be listed on the Assets page.
{% endhint %}
# Amazon Elastic Kubernetes Service
## Connection Requirements
### 1 - AWS Access Key ID
Enter the AWS Access Key ID of an IAM user or role with read access to EKS, EC2, and Auto Scaling resources.
### 2 - AWS Secret Access Key
Enter the AWS Secret Access Key paired with the Access Key ID above.
### 3 - AWS Region
Optional bootstrap region used to enumerate available regions. If left blank, `us-east-1` is used. The adapter discovers EKS clusters across all enabled regions regardless of this value.
{% hint style="danger" %}
**Permissions Required**
The provided credentials need read-only access to the following AWS APIs:
* **EC2**: `ec2:DescribeRegions`, `ec2:DescribeInstances`
* **EKS**: `eks:ListClusters`, `eks:ListNodegroups`, `eks:DescribeNodegroup`
* **Auto Scaling**: `autoscaling:DescribeAutoScalingGroups`
{% endhint %}
***
# AWS EC2
## Connection Requirements
{% stepper %}
{% step %}
### Access Key ID
Enter your AWS Access Key ID.
{% hint style="info" %}
🔵 **Example:**\
Learn how to retrieve Access Key ID
{% endhint %}
{% endstep %}
{% step %}
### Secret Access Key
Enter your AWS Secret Access Key.
{% hint style="info" %}
🔵 **Example:**\
Learn how to retrieve Secret Access Key
{% endhint %}
{% endstep %}
{% step %}
### Region
Enter the AWS region where your EC2 instances are located.
{% hint style="info" %}
🔵 **Example:**\
eu-north-1
{% endhint %}
{% endstep %}
{% endstepper %}
# AWS IAM
## Connection Requirements
{% stepper %}
{% step %}
### Access Key ID
Enter your AWS Access Key ID.
{% hint style="info" %}
🔵 **Example:**\
Learn how to retrieve it:
{% endhint %}
{% endstep %}
{% step %}
### Secret Access Key
Enter your AWS Secret Access Key.
{% hint style="info" %}
🔵 **Example:**\
Learn how to retrieve it:
{% endhint %}
{% endstep %}
{% endstepper %}
{% hint style="warning" %}
⚠️ **Attention**\
Please ensure the provided credentials and instance details are accurate. Connection tests will verify the validity of the information entered. Final details will be available on the **Assets** page once the operation completes.
{% endhint %}
# AWS Services
## Connection Requirements
### 1 - AWS Access Key ID
The Access Key ID for an IAM user or role with read permissions to the AWS services you want to inventory. You can find this in the AWS IAM Console under Security Credentials.
### 2 - AWS Secret Access Key
The Secret Access Key associated with the Access Key ID above. This is only shown once when the key is created.
### 3 - AWS Region (Optional)
Specify a single AWS region to limit data collection (e.g., us-east-1). If left blank, the adapter will automatically discover and scan all available regions.
{% hint style="info" %}
**Default Values**
* **AWS Region**: All regions (when left blank)
{% endhint %}
{% hint style="danger" %}
**Permissions Required**
The IAM user or role needs read-only access to the following AWS services: S3, RDS, Lambda, Elastic Load Balancing (v2), ElastiCache, DynamoDB, EKS, ECS, CloudFront, Redshift, EC2 (for region discovery), and STS (for connection testing). The AWS managed policy **ReadOnlyAccess** covers all of these.
{% endhint %}
# Azure Kubernetes Service
## Connection Requirements
### 1 - Tenant ID
Enter the Azure Active Directory tenant ID where your AKS subscription lives.
### 2 - Subscription ID
Enter the Azure subscription ID that contains the AKS clusters.
### 3 - Client ID
Enter the Application (Client) ID of an Azure AD app registration with permissions to read AKS resources.
### 4 - Client Secret
Enter the client secret generated for the app registration above.
### 5 - Proxy
Proxy URL (optional).
### 6 - Is Secure
Choose this if your connection is going to be over HTTPS (optional, default: **True**).
### 7 - Timeout
The amount of time (in seconds) to wait for API responses. (default: 30)
{% hint style="danger" %}
**Permissions Required**
The app registration needs the **Reader** role assigned at the subscription scope (or a custom role granting the following actions):
* `Microsoft.ContainerService/managedClusters/read`
* `Microsoft.ContainerService/managedClusters/agentPools/read`
* `Microsoft.ContainerService/managedClusters/agentPools/machines/read`
{% endhint %}
# Azure DevOps Services Git
{% stepper %}
{% step %}
### Personal Access Token (PAT)
Personal Access Token is required to authenticate and authorize API requests to Azure DevOps Services.\
To create a Personal Access Token:
* Login to your Azure DevOps account.
* Go to User Settings then Personal Access Tokens then click New Token.
* Set a descriptive Name and an appropriate Expiration date.
* Select the required Organization.
* Under Scopes, choose Custom defined and ensure the following permissions are granted: Code (Read) — to list repositories and read commit data. Project and Team (Read) — to retrieve project metadata. User Profile (Read) — to access identity information.
* Click Create and securely copy the generated token.
{% hint style="info" %}
**Code (Read)** — to list repositories and read commit data.\
**Project and Team (Read)** — to retrieve project metadata.\
**User Profile (Read)** — to access identity information.
{% endhint %}
{% hint style="warning" %}
The token owner must have at least "Basic Read" access to the Azure DevOps project and repository.
{% endhint %}
{% endstep %}
{% step %}
### Organization Name
The name of your Azure DevOps organization. You can find it in the URL of your DevOps portal:\
Example:
{% endstep %}
{% step %}
### Is Secure
This optional field defines whether the connection uses secure protocol. It should be set to true for all Azure DevOps Service connections (HTTPS).
{% endstep %}
{% endstepper %}
{% hint style="warning" %}
Please perform a connection test to ensure there is a valid connection to the host.\
When the discovery operation is finalized, you will be able to see the details on the **Assets** page.
{% endhint %}
# Azure DevOps Services Users
{% stepper %}
{% step %}
### Organization Name
The name of your Azure DevOps organization. You can find it in the URL of your DevOps portal.\
Example: `https://dev.azure.com/your_organization_name/`
{% endstep %}
{% step %}
### Personal Access Token (PAT)
Personal Access Token is required to authenticate and authorize API requests to Azure DevOps Services.
* Login to your Azure DevOps account.
* Go to User Settings then Personal Access Tokens then click New Token.
* Set a descriptive Name and an appropriate Expiration date.
* Select the required Organization.
* Under Scopes, choose Custom defined and ensure the following permission is granted: Graph (Read) — to access identity information.
* Click Create and securely copy the generated token.
{% hint style="info" %}
🔵 Graph (Read) — to access identity information.
{% endhint %}
{% hint style="info" %}
🔵 Important:\
The token owner must have at least "Basic Read" access to the Azure DevOps project and repository.
{% endhint %}
{% endstep %}
{% step %}
### Is Secure
This optional field defines whether the connection uses secure protocol. It should be set to `true` for all Azure DevOps Service connections (HTTPS).
{% endstep %}
{% endstepper %}
{% hint style="warning" %}
⚠️ Attention\
Please perform a connection test to ensure there is a valid connection to the host.\
When the discovery operation is finalized, you will be able to see the details on the Assets page.
{% endhint %}
# Azure AI Foundry
## Connection Requirements
Login URL
{% hint style="info" %}
🔵 Default:\
login.microsoftonline.com
{% endhint %}
{% stepper %}
{% step %}
### Tenant ID
Follow these steps to retrieve the ID for an Azure AD tenant in the Azure portal.
* Sign in to the Azure portal .
* Confirm that you are signed into the tenant for which you want to retrieve the ID. If not, switch directories so that you're working in the right tenant.
* Under the Azure services heading, select Azure Active Directory .
* Find the Tenant ID in the Basic information section of the Overview screen.
* Copy the Tenant ID.
{% endstep %}
{% step %}
### Client ID
* Login into your azure account.
* Select azure active directory in the left sidebar.
* Click Enterprise applications .
* Click All applications .
* Select the application which you have created.
* Click Properties .
* Copy the Application ID.
{% endstep %}
{% step %}
### Client Secret
* Navigate to your app registration in the Azure portal.
* Select the Certificates & secrets setting.
* Under Client secrets , click New client secret to create a new secret.
* Provide a description for the secret, and choose the desired expiration interval.
* Immediately copy the value of the new secret to a secure location. The full value is displayed to you only once.
{% endstep %}
{% step %}
### Subscription ID
Follow these steps to get the identity of a subscription in the Azure portal.
* Sign in to the Azure portal .
* Under the Azure services heading, select Subscriptions .
* Find the Subscription ID for the subscription shown in the second column.
* Copy the Subscription ID.
{% endstep %}
{% endstepper %}
Https Proxy
Proxy url. (optional)
{% hint style="warning" %}
⚠️ Attention\
Please perform a connection test to ensure there is a valid connection to the host.\
When the discovery operation is finalized, you will be able to see the details on the Assets page.
{% endhint %}
# Azure Enterprise Applications
## Connection Requirements
{% stepper %}
{% step %}
### Client ID
The unique identifier (Application ID) of your registered application. You can find it under Microsoft Entra ID > App Registrations by selecting the application you created for Microsoft Graph API access.
{% hint style="info" %}
🔵 **Microsoft Entra ID**\
Sign into the Microsoft Azure Portal. From the left-hand navigation pane, select . Go to App Registrations and choose the application that will be used to access the Microsoft Graph API. In the application's left-hand menu, select API Permissions . Click “Add a permission” , then choose “Microsoft Graph” . Choose Application Permissions and add the required permissions: Application.Read.All or Directory.Read.All\
Application.Read.All or Directory.Read.All
{% endhint %}
{% endstep %}
{% step %}
### Client Secret
A secret value used by your app to authenticate itself when requesting tokens from Microsoft Entra ID.
{% endstep %}
{% step %}
### Tenant ID
The directory (tenant) ID of your Microsoft Entra environment. You can find it in Microsoft Entra ID > Overview under the Basic Information section.
{% endstep %}
{% step %}
### Proxy URL
Optional proxy URL for routing API requests if your environment requires it.
{% endstep %}
{% step %}
### Timeout
The amount of time (in seconds) to wait for API responses. (default: 30)
{% endstep %}
{% endstepper %}
{% hint style="warning" %}
⚠️ **Attention**\
Please perform a **connection test** to ensure there is a valid connection to the host.\
When the discovery operation is finalized, you will be able to see the details on the **Assets** page.
{% endhint %}
# Azure Log Analytics
## Connection Requirements
{% stepper %}
{% step %}
### Domain
Url Address:
> 🔵 **Default:**\
> api.loganalytics.io
> {% endstep %}
{% step %}
### Tenant ID
Follow these steps to retrieve the ID for an Azure AD tenant in the Azure portal:
* Sign in to the Azure portal.
* Confirm that you are signed into the tenant for which you want to retrieve the ID. If not, switch directories so that you're working in the right tenant.
* Under the Azure services heading, select Azure Active Directory.
* Find the Tenant ID in the Basic information section of the Overview screen.
* Copy the Tenant ID.
{% endstep %}
{% step %}
### Workspace IDs
Workspace IDs are the unique identifiers for your Azure Log Analytics workspaces. You can find them in the Azure portal.
Note: No asset will be fetched if you don't provide valid workspace IDs.
{% endstep %}
{% step %}
### Client ID
Steps to obtain the Client (Application) ID:
* Login into your Azure account.
* Select Azure Active Directory in the left sidebar.
* Click Enterprise applications.
* Click All applications.
* Select the application which you have created.
* Click Properties.
* Copy the Application ID.
{% endstep %}
{% step %}
### Client Secret
Steps to create and retrieve a Client Secret:
* Navigate to your app registration in the Azure portal.
* Select the Certificates & secrets setting.
* Under Client secrets, click New client secret to create a new secret.
* Provide a description for the secret, and choose the desired expiration interval.
* Immediately copy the value of the new secret to a secure location. The full value is displayed to you only once.
{% endstep %}
{% step %}
### Query
Query that will be executed on Azure Log Analytics. Your response will come according to your query.
Important: Ensure the primary key in your query result is "Computer".
{% endstep %}
{% endstepper %}
{% hint style="warning" %}
Please perform a **connection test** to ensure there is a valid connection to the host.
When the discovery operation is finalized, you will be able to see the details on the **Assets** page.
{% endhint %}
# Azure Entra
## Connection Requirements
{% stepper %}
{% step %}
### Client ID
Your app's unique Client ID (Application ID). You can find it on the overview page for the application in Identity > Applications > Enterprise Applications.
{% hint style="info" %}
🔵 **Azure Active Directory**\
Sign into the Microsoft Azure Portal. From the left-hand navigation pane, select . Go to App Registrations and find the application you are using to access the Microsoft Graph API. Click on the application name you want to use. Find API Permissions on left-hand navigation pane. Click on “Add a permission”, then choose “Microsoft Graph”. Select “Application Permissions” and add the necessary permissions. Finally, grant admin consent for those permissions.
{% endhint %}
Required permissions:
* User.Read.All
* Device.Read.All
* Directory.Read.All
{% endstep %}
{% step %}
### Client Secret
A textual value your app can use to identify itself. It's used to authenticate your app on the tenant architecture.
{% endstep %}
{% step %}
### Tenant ID
Tenant ID of the registered app. You can find it on the overview page for the application under the Basic Information section.
{% endstep %}
{% step %}
### Proxy URL
Proxy URL. (optional)
{% endstep %}
{% step %}
### Timeout
Amount of time that will be waited for API response. (default: 30)
{% endstep %}
{% step %}
### Users Enrichment
To enrich additional user data such as user licenses, sign-in activities, audit logs, and memberOf details, this option must be enabled.
{% hint style="info" %}
🔵 **AuditLog.Read.All**\
You have at least these permissions to enable this option:
{% endhint %}
* AuditLog.Read.All
* RoleManagement.Read.Directory
* DeviceManagementApps.Read.All
* User.ReadBasic.All
* Directory.Read.All
{% endstep %}
{% endstepper %}
{% hint style="warning" %}
⚠️ **Attention**\
Please perform a **connection test** to ensure there is a valid connection to the host.\
When the discovery operation is finalized, you will be able to see the details on the **Assets** page.
{% endhint %}
# Azure Services
## Connection Requirements
{% stepper %}
{% step %}
### Login URL
Url Address:
> 🔵 **Default:**\
> login.microsoftonline.com
> {% endstep %}
{% step %}
### Tenant ID
Follow these steps to retrieve the ID for an Azure AD tenant in the Azure portal.
* Sign in to the Azure portal.
* Confirm that you are signed into the tenant for which you want to retrieve the ID. If not, switch directories so that you're working in the right tenant.
* Under the Azure services heading, select Azure Active Directory.
* Find the Tenant ID in the Basic information section of the Overview screen.
* Copy the Tenant ID.
{% endstep %}
{% step %}
### Client ID
* Login into your azure account.
* Select azure active directory in the left sidebar.
* Click Enterprise applications.
* Click All applications.
* Select the application which you have created.
* Click Properties.
* Copy the Application ID.
{% endstep %}
{% step %}
### Client Secret
* Navigate to your app registration in the Azure portal.
* Select the Certificates & secrets setting.
* Under Client secrets, click New client secret to create a new secret.
* Provide a description for the secret, and choose the desired expiration interval.
* Immediately copy the value of the new secret to a secure location. The full value is displayed to you only once.
{% endstep %}
{% step %}
### Subscription ID
Follow these steps to get the identity of a subscription in the Azure portal.
* Sign in to the Azure portal.
* Under the Azure services heading, select Subscriptions.
* Find the Subscription ID for the subscription shown in the second column.
* Copy the Subscription ID.
{% endstep %}
{% step %}
### Proxy
Proxy url. (optional)
{% endstep %}
{% step %}
### Is Secure?
Enable this option if the connection will be established over HTTPS.
{% endstep %}
{% endstepper %}
{% hint style="warning" %}
⚠️ **Permissions**\
In order to successfully connect to Microsoft Azure Services, the user that you created must be granted the following API permissions (resource paths):
* `/Microsoft.Compute/virtualMachines`
* `/Microsoft.DesktopVirtualization/applicationGroups`
* `/Microsoft.Storage/storageAccounts`
* `/Microsoft.Network/loadBalancers`
* `/Microsoft.Network/azureFirewalls`
* `/Microsoft.Network/networkSecurityGroups`
* `/Microsoft.Web/containerApps`
* `/Microsoft.ContainerRegistry/registries`
* `/Microsoft.Network/privateDnsZones/{zone}/virtualNetworkLinks`
* `/Microsoft.Network/privateEndpoints`
* `/Microsoft.Network/publicIPAddresses`
* `/Microsoft.ManagedIdentity/userAssignedIdentities`
* `/Microsoft.Web/sites/{site}/functions`
* `/Microsoft.Network/networkWatchers`
* `/Microsoft.Network/virtualNetworks`
* `/resourcegroups`
* `/Microsoft.DBforPostgreSQL/flexibleServers`
* `/Microsoft.KeyVault/vaults/read`
* `/Microsoft.DevCenter/*/read`
* `/Microsoft.Network/privateDnsZones`
* `/Microsoft.Logic/workflows`
{% endhint %}
{% hint style="warning" %}
⚠️ **Attention**\
Please perform a **connection test** to ensure there is a valid connection to the host.\
When the discovery operation is finalized, you will be able to see the details on the **Assets** page.
{% endhint %}
# Backup Radar
## Connection Requirements
{% stepper %}
{% step %}
### URL
URL of the BackupRadar host.
{% endstep %}
{% step %}
### API Key
* In Backup Radar, navigate to Settings > API Keys.
* Click Add API Key to generate a new API key.
* Click the copy button to copy your API key to your clipboard.
{% endstep %}
{% step %}
### Is Secure?
Enable this option if the connection will be established over HTTPS.
{% endstep %}
{% endstepper %}
{% hint style="warning" %}
⚠️ **Attention**\
Please perform a **connection test** to ensure there is a valid connection to the host.\
When the discovery operation is finalized, you will be able to see the details on the **Assets** page.
{% endhint %}
# Barracuda CloudGen Firewall
## Connection Requirements
{% stepper %}
{% step %}
### IP
The IP address of the Barracuda CloudGen Firewall.
{% endstep %}
{% step %}
### Port
Port number *(optional, default: **8443**)*
{% endstep %}
{% step %}
### API Token
Steps to create an API token for authentication:
* Go to **CONFIGURATION > Configuration Tree > Box > Infrastructure Services > REST API Service** and click **Lock**.
* In the left menu, click **Access Tokens**.
* Click the **+** button in the Access Tokens section.
* Enter a **Name** for the token and click **OK**. The Access Tokens window will open.
* Click **Generate new token**.
* Enter the **Admin name** for the user used for authentication.
* In the **Time to live** field, enter the number of days the token should be valid.
* Click **OK** to finish.
{% endstep %}
{% step %}
### Is Secure?
Enable this option if the connection will be established over **HTTPS**.
{% endstep %}
{% endstepper %}
{% hint style="warning" %}
⚠️ **Attention**\
Please perform a **connection test** to ensure there is a valid connection to the Barracuda CloudGen Firewall host.\
When the discovery operation is finalized, you will be able to see the details on the **Assets** page.
{% endhint %}
# Backblaze
## Connection Requirements
{% stepper %}
{% step %}
### Domain
Backblaze Domain (default: **api.backblazeb2.com**)
{% endstep %}
{% step %}
### Master Application Key and Master Application Key ID
* Sign in to the Backblaze web console.
* In the left navigation menu under B2 Cloud Storage, click Application Keys.
* In the Master Application Key section, click Generate New Master Application Key.
* Click Yes! Generate Master Key.
{% hint style="info" %}
🔵 Notes
Because your master app key is shown only when you generate it, save your master app key in a secure location if you plan to use it more than once. The term "master application key ID" was formerly called an "account ID." If you use an integration in which the terminology was not updated to reflect this change, the master application key ID works in place of your account ID. For a standard app key, you can use that key's keyID in place of an account ID. You can find your master app key ID on the Application Keys page.
{% endhint %}
{% endstep %}
{% step %}
### Https Proxy
Https Proxy url. (optional)
{% endstep %}
{% endstepper %}
{% hint style="warning" %}
⚠️ Attention
It is important to perform a connection test to verify that the Backblaze host can be successfully reached. Once the discovery process is complete, the connection details will be visible on the Assets page.
{% endhint %}
# Beamsec PhishTrace
## Connection Requirements
{% stepper %}
{% step %}
### IP
Beamsec client Server IP Address.
{% endstep %}
{% step %}
### Port
Port number (optional, default: 443).
{% endstep %}
{% step %}
### Username
The username which is going to be used by OctoXLabs CSAM PLATFORM Asset to fetch data from Beamsec Phishtrace.
{% endstep %}
{% step %}
### Password
The Password of the provided username.
{% endstep %}
{% step %}
### Is Secure?
Enable this if your connection is going to be over HTTPS.
{% endstep %}
{% step %}
### Is Old Version?
Enable this if your instance version is older than v7.0.0.0.
{% endstep %}
{% step %}
### Timeout
Amount of time that will be waited for API response. (default: 30)
Settings > Authorization > Choose the role you want to allow the Token generation > settings > allow API Token.
{% endstep %}
{% endstepper %}
{% hint style="warning" %}
Please perform a connection test to ensure there is a valid connection to the host.\
When the discovery operation is finalized, you will be able to see the details on the **Assets** page.
{% endhint %}
# Beeline Professional Edition Connect
## Connection Requirements
### 1 - Tenant
Your Beeline tenant subdomain. The full base URL will be constructed as **https\://{tenant}.utmost.co**. Enter only the subdomain portion (e.g., **mycompany**).
### 2 - Client ID
The OAuth2 client ID configured for this integration via the Beeline Professional Edition Enterprise Application. This is set up by your system administrator.
### 3 - Client Secret
The OAuth2 client secret paired with the Client ID above.
### 4 - HTTPS Proxy
HTTPS proxy address if your environment requires one to reach Beeline (e.g., **proxy.company.com:8080**). Leave empty if not needed.
### 5 - Timeout
The amount of time (in seconds) to wait for API responses. (default: 30)
{% hint style="danger" %}
**Attention**
Please perform a connection test to ensure there is a valid connection to the Beeline Professional Edition Connect host. When the discovery operation is finalized you will be able to see the details on Assets page.
{% endhint %}
# BeyondTrust BeyondInsight
{% stepper %}
{% step %}
### IP
IP address that you want to connect to. Requests will be sent to this address.
{% endstep %}
{% step %}
### Port
Port number (optional, default: 443).
{% endstep %}
{% step %}
### API Key
To get API Key for Beyond Trust Beyond Insight API:
* Login to Web Console as a BeyondTrust Administrator.
* Navigate to Configuration > General > API registrations
* Click Create API Registration and then API key Policy
* Give the policy a name to identify it and select the authentication rule options relevant to your environment
* Click ‘Add Authentication Rule’ to provide a list of the allowed IP addresses where the API scripts will be run from. If using a proxy/forwarder/load balancer, make sure to allow those as well. If they are not using forwarding rules, the source IP address will not match that of the requestor machine. In this example, we are allowing a large range of IP addresses to make sure this works:
* Once the rule is updated this will make the API connection ‘Active’
{% endstep %}
{% step %}
### Username
Username that will be used for the Beyond Trust Beyond Insight.
{% endstep %}
{% step %}
### Password
Password that will be used for the Beyond Trust Beyond Insight.
{% endstep %}
{% step %}
### Ignore Workgroups
Excludes the specified workgroup IDs from the search.
{% endstep %}
{% step %}
### Timeout
Amount of time that will be waited for API response. (default: 120)
{% endstep %}
{% step %}
### Is Secure?
Enable this option if the connection will be established over HTTPS.
{% endstep %}
{% endstepper %}
# BeyondTrust Entitle
## Connection Requirements
### 1 - Domain
The API host for your Entitle tenant. In most deployments this is `api.entitle.io`. Change it only if BeyondTrust has provisioned a dedicated API endpoint for your organization.
### 2 - API Token
A personal or service API token generated from the Entitle admin console. Navigate to the **Tokens** section, click **Add**, choose **API token**, provide a token name (2-250 characters) and an expiration, then click **Reveal token** to copy the value. The token is sent as a Bearer token in the `Authorization` header.
### 3 - Proxy
Optional. Use `host:port` format if the connector must reach `api.entitle.io` through an outbound HTTP proxy. Leave empty for direct connections.
### 4 - Timeout
Optional. Request timeout in seconds. Increase this if Entitle responses are slow under load. (default: 30)
{% hint style="info" %}
**Default Values**
* **Domain**: api.entitle.io
* **Proxy**: empty
* **Timeout**: 30 seconds
{% endhint %}
{% hint style="danger" %}
**Permissions Required**
The API token must have read access to the `/public/v1/users` endpoint. Create the token from an account that can list all users in the Entitle tenant so the connector can fetch the complete user inventory.
{% endhint %}
# BeyondTrust Password Safe
## Connection Requirements
### 1 - IP
The IP address or hostname of your BeyondTrust Password Safe appliance.
### 2 - Port
Port number (optional, default: **443**).
### 3 - API Key
An API key registered in BeyondTrust Password Safe. Navigate to **Configuration > General > API Registrations** to create or retrieve an API key.
### 4 - Username
The username of a BeyondTrust Password Safe account with API access. This account will be used with the RunAs authentication method.
### 5 - Password
The password of the provided username.
### 6 - Timeout
The amount of time (in seconds) to wait for API responses. (default: 120)
### 7 - Is Secure
Choose this if your connection is going to be over HTTPS (optional, default: **True**).
{% hint style="danger" %}
**Permissions Required**
The API registration must have access to the Managed Systems API endpoint. The user account needs read permissions on managed systems.
{% endhint %}
# BeyondTrust PRA
## Connection Requirements
### 1 - Domain
The hostname of your BeyondTrust PRA appliance (e.g., access.example.com). Do not include the protocol (https\://).
### 2 - Client ID
The OAuth2 client ID for API access. Navigate to **/login > Management > API Configuration** in your PRA console to create an API account and obtain the client ID.
### 3 - Client Secret
The OAuth2 client secret associated with the client ID above.
### 4 - Proxy
Proxy address for connecting to BeyondTrust PRA (optional).
### 5 - Timeout
The amount of time (in seconds) to wait for API responses. (default: 30)
{% hint style="danger" %}
**Attention**
Please perform a connection test to ensure there is a valid connection to the BeyondTrust PRA appliance. The API account must have read access to the Configuration API (Jump Clients and Users endpoints). When the discovery operation is finalized you will be able to see the details on Assets page.
{% endhint %}
# BeyondTrust Privilege Management
## Connection Requirements
### 1 - Domain
Enter the full hostname of your EPM Cloud instance services endpoint. This follows the format `-services.pm.beyondtrustcloud.com`, where `` is your tenant identifier. You can find this in the URL when logged into the EPM Cloud console.
### 2 - Client ID
The OAuth2 Client ID for API access. Navigate to **Configuration > Settings > API Settings** in the EPM Cloud console to create an API account and obtain the Client ID.
### 3 - Client Secret
The OAuth2 Client Secret associated with the Client ID above. This is generated when creating the API account in the API Settings page.
### 4 - Proxy
Proxy URL (optional).
### 5 - Timeout
The amount of time (in seconds) to wait for API responses. (default: 30)
{% hint style="info" %}
**Default Values**
* **Timeout**: 30 seconds
{% endhint %}
{% hint style="danger" %}
**Permissions Required**
The API account must have read access to the Management API. Create an API account under **Configuration > Settings > API Settings** with the `urn:management:api` scope.
{% endhint %}
# BeyondTrust Remote Support
## Connection Requirements
### 1 - IP
IP address or hostname of the BeyondTrust Remote Support appliance.
### 2 - Port
Port number (optional, default: **443**).
### 3 - Client ID
**To obtain your Client ID:**
{% hint style="info" %}
1. Log in to the BeyondTrust Remote Support web interface as an administrator.
2. Navigate to **Management > API Configuration**.
3. Click **Add API Account** to create a new OAuth API account.
4. Copy the generated **Client ID**.
{% endhint %}
### 4 - Client Secret
The Client Secret associated with the Client ID created above.
{% hint style="info" %}
Make sure to copy the Client Secret immediately after creation, as it will not be shown again.
{% endhint %}
### 5 - Timeout
The amount of time (in seconds) to wait for API responses. (default: 30)
### 6 - Is Secure
Choose this if your connection is going to be over HTTPS (optional, default: **True**).
{% hint style="danger" %}
**Attention**
Please perform a connection test to ensure there is a valid connection to the BeyondTrust Remote Support host. When the discovery operation is finalized you will be able to see the details on Assets page.
{% endhint %}
# BigFix (formally IBM BigFix)
## Connection Requirements
{% stepper %}
{% step %}
### IP
BigFix Server IP Address.
{% endstep %}
{% step %}
### Port
Port number (optional, default: 52311).
{% endstep %}
{% step %}
### Username
The username which is going to be used by OctoXLabs CSAM PLATFORM Asset to fetch data from BigFix.
The following conditions must be satisfied to use the BigFix REST API:
* The WebReports service must be running. If you installed multiple Web Reports servers, local or remote, the Web Reports server that is selected for using the REST API is the first entry that appears in the table dbo.AGGREGATEDBY contained in the database BFEnterprise.
* The user logging into the REST API must be defined as a BigFix Console operator () with the Can use REST API and the Custom Content permissions set to YES in its definition or in one of the assigned roles.
* If you plan to use the REST API over HTTPS, you must apply the configuration described in Customizing HTTPS on REST API.
* The IEM CLI does not support the BigFix FIPS-compliant cryptography library. If you plan to use that library in your REST API HTTP environment, use a different REST API Client.
* Ensure that the font set in the command prompt properties of your workstation is set to a value different from Raster Fonts, otherwise you might get this warning message "Warning: Current console font may not display locale characters correctly".
{% endstep %}
{% step %}
### Password
The Password of the provided username.
{% endstep %}
{% step %}
### Is Secure?
IP address secure or not.
{% endstep %}
{% step %}
### Use Query Based Version?
Instead of conventional request you may prefer to use the query endpoint.
Example query:
{% code title="Example Query" %}
```
(names of it, ids of it, last report time of it, operating systems of it, ip addresses of it, agent versions of it) of bes computers whose (name of it = "name_of_the_hosts_will_be_here")
```
{% endcode %}
{% endstep %}
{% step %}
### BES Property For Installed Softwares
In addition to our base query, if you want to fetch installed software information on computers, you need to create a report on BigFix and enter the name of the analyze in here.
{% endstep %}
{% step %}
### Timeout
Amount of time that will be waited for API response. (default: 90)
{% endstep %}
{% step %}
### Thread Count
Amount of multiple threads that will be generated during discovery process. (max: 32, min: 1, default: 32)
Note: Increasing the number may decrease the discovery time for this adapter; however, it will use more resources.
{% endstep %}
{% step %}
### Sleep
Amount of time that will be waited between thread generation. (default: 0)
{% endstep %}
{% endstepper %}
{% hint style="warning" %}
Please perform a connection test to ensure there is a valid connection to the host.
When the discovery operation is finalized, you will be able to see the details on the Assets page.
{% endhint %}
# Binalyze Air
## Connection Requirements
1. **IP**\
IP address of the Binalyze Air.
2. **Port**\
Port number.
3. **API Token**
* Login Binalyze Air Console
* Generate an API token from Settings > API Tokens
4. **Page Size**\
Number of assets per page for pagination (Default: 100).
5. **Timeout**\
Amount of time that will be waited for API response. (default: 30)
6. **Get asset tasks**\
Get asset tasks when enabled. (optional, default: False)
7. **SSL**\
Use SSL for connection. (optional, default: Encrypted)
# BigFix Inventory
## Connection Requirements
{% stepper %}
{% step %}
### IP
BigFix Inventory Server IP Address.
{% endstep %}
{% step %}
### Port
Port number (optional, default: 9081).
{% endstep %}
{% step %}
### Token
The token which is going to be used by OctoXLabs CSAM PLATFORM Asset to fetch data from BigFix Inventory.
To get token for BigFix Inventory REST API, log in to BigFix Inventory, hover over the User icon and click Profile. Then, click Show token.
{% endstep %}
{% step %}
### Is Secure?
IP address secure or not (optional, default: Encrypted).
{% endstep %}
{% step %}
### Thread Count
Number of threads to use for fetching data. (default: 32)\
Minimum value: 1, Maximum value: 32
{% endstep %}
{% step %}
### Sleep Time
Amount of time that will be waited between thread creation. The value in here represents seconds and increasing it will also increase the discovery time a little bit. (Default: 0)
{% endstep %}
{% step %}
### Timeout
Amount of time that will be waited for API response. (default: 60)
{% endstep %}
{% endstepper %}
{% hint style="info" %}
🟠 Note\
This adapter supports BigFix Inventory version 9.2.10 and above.
{% endhint %}
{% hint style="warning" %}
⚠️ Attention\
Please perform a **connection test** to ensure there is a valid connection to the host.\
When the discovery operation is finalized, you will be able to see the details on the **Assets** page.
{% endhint %}
# Bill
## Connection Requirements
{% stepper %}
{% step %}
### Domain
The domain of Bill.
{% hint style="info" %}
Default:\
gateway.stage.bill.com
{% endhint %}
{% endstep %}
{% step %}
### API Token
To generate an API token in **BILL Spend & Expense**, follow these steps:
{% stepper %}
{% step %}
Open your Spend & Expense profile settings by clicking the **Profile** icon in the top-right corner and selecting **Profile**, or by selecting **My Account** from the Spend & Expense navigation menu.
{% endstep %}
{% step %}
Go to the **Settings** tab.
{% endstep %}
{% step %}
Locate the **API tokens** section.
{% endstep %}
{% step %}
Click **Generate new token**.
{% endstep %}
{% step %}
Your API token will appear in the **New token** field. Copy and store it securely, as it will not be displayed again once the window is closed.
{% endstep %}
{% endstepper %}
{% hint style="warning" %}
In the production environment, the Spend & Expense API user must have the **ADMIN** user role to generate a Spend & Expense API token.
{% endhint %}
{% endstep %}
{% step %}
### Proxy
Proxy URL. *(optional)*
{% endstep %}
{% step %}
### Is Secure?
Enable this option if the connection will be established over **HTTPS**.
{% endstep %}
{% endstepper %}
{% hint style="warning" %}
Please perform a **connection test** to ensure there is a valid connection to the Bill host.\
When the discovery operation is finalized, you will be able to see the details on the **Assets** page.
{% endhint %}
# BinaryEdge
## Connection Requirements
{% stepper %}
{% step %}
### Domain
The domain of BinaryEdge.
> 🔵 **Default:**\
>
> {% endstep %}
{% step %}
### API Token
Log in to your BinaryEdge account at *app.binaryedge.io* and generate a new API token.
{% endstep %}
{% step %}
### Fetch Vulnerabilities
Fetch vulnerability information. *(optional, default: **True**)*
**Note:** Available for paid subscriptions only.
{% endstep %}
{% endstepper %}
{% hint style="warning" %}
⚠️ **Attention**\
Please perform a **connection test** to ensure there is a valid connection to the BinaryEdge host.\
When the discovery operation is finalized, you will be able to see the details on the **Assets** page.
{% endhint %}
# Bitdefender
## Connection Requirements
{% stepper %}
{% step %}
### URL
Url address that you want to connect to. Request will be sent according to that path
{% endstep %}
{% step %}
### Username
Username that is saved on bit defender settings.
{% endstep %}
{% step %}
### Password
Password that is saved on bit defender settings.
{% endstep %}
{% endstepper %}
{% hint style="warning" %}
⚠️ **Attention**\
Please perform a **connection test** to ensure there is a valid connection to the host.\
When the discovery operation is finalized, you will be able to see the details on the **Assets** page.
{% endhint %}
# Bitbucket Cloud
## Connection Requirements
{% stepper %}
{% step %}
### Username
Personal Bitbucket username.
{% hint style="info" %}
To create a Bitbucket account, simply go to Atlassian's sign-up page and create an account with your email address.
{% endhint %}
{% endstep %}
{% step %}
### Password
Personal Bitbucket app password.
{% hint style="info" %}
You need to go to the Settings > App passwords page in your Bitbucket account. From there, you can create a password by giving it a label and selecting the permissions you need (for example, the Read permission under Workspaces).
{% endhint %}
{% endstep %}
{% step %}
### Https Proxy
Https Proxy URL. (optional)
{% endstep %}
{% step %}
### Per Page
Amount of devices going to be fetched per request. Cloud version: default length is 25
{% endstep %}
{% endstepper %}
{% hint style="warning" %}
Please perform a **connection test** to ensure there is a valid connection to the host.\
When the discovery operation is finalized, you will be able to see the details on the **Assets** page.
{% endhint %}
# Bitbucket Self Hosted
## Connection Requirements
{% stepper %}
{% step %}
### Domain
The Domain of the Bitbucket.
{% endstep %}
{% step %}
### Port
Port number (optional, default: 443).
{% endstep %}
{% step %}
### Username
Personal Bitbucket username.
{% hint style="info" %}
To create a Bitbucket account, simply go to Atlassian's sign-up page and create an account with your email address.
{% endhint %}
{% endstep %}
{% step %}
### Password
Personal Bitbucket app password.
{% hint style="info" %}
You need to go to the Settings > App passwords page in your Bitbucket account. From there, you can create a password by giving it a label and selecting the permissions you need (for example, the Read permission under Workspaces).
{% endhint %}
{% endstep %}
{% step %}
### Is Secure?
Enable this option if the connection will be established over HTTPS.
{% endstep %}
{% step %}
### Per Page
Amount of devices going to be fetched per request. Self-hosted version: default length is 25
{% endstep %}
{% endstepper %}
{% hint style="warning" %}
Please perform a **connection test** to ensure there is a valid connection to the host.\
When the discovery operation is finalized, you will be able to see the details on the **Assets** page.
{% endhint %}
# Bitwarden Cloud
## Connection Requirements
{% stepper %}
{% step %}
### Domain
The default API domain for Bitwarden Cloud is `api.bitwarden.com`.\
Use this domain unless your organization has a custom API endpoint.
{% endstep %}
{% step %}
### Client ID & Client Secret
The `client_id` and `client_secret` for the API key can be obtained by an organization owner from the **Admin Console**.\
Navigate to **Settings → Organization Info** and scroll down to the **API Key** section to view or generate your credentials.
{% endstep %}
{% endstepper %}
{% hint style="warning" %}
Please perform a **connection test** to ensure there is a valid connection to the Bitwarden Cloud host.\
When the discovery operation is finalized, you will be able to see the details on the **Assets** page.
{% endhint %}
# BitSight Security Ratings
## Connection Requirements
{% stepper %}
{% step %}
### Domain
The Domain of the BitSight Security Ratings. **Default: api.bitsighttech.com**
{% endstep %}
{% step %}
### API Token
In the User API Token section of the User Preferences page, select Generate New Token.
{% endstep %}
{% step %}
### Proxy
Proxy URL. (optional)
{% endstep %}
{% endstepper %}
{% hint style="warning" %}
Please perform a connection test to ensure there is a valid connection to the host. When the discovery operation finalizes you will be able to see the details on the Assets page.
{% endhint %}
# Bizzy
## Connection Requirements
{% stepper %}
{% step %}
### IP
IP address that you want to connect to. Requests will be sent to this address.
{% endstep %}
{% step %}
### Port
Port number (optional, default: 443).
{% endstep %}
{% step %}
### Username
Username that will be used for the Bizzy.
{% endstep %}
{% step %}
### Password
Password that will be used for the Bizzy.
{% endstep %}
{% step %}
### Is Secure?
Enable this option if the connection will be established over HTTPS.
{% endstep %}
{% step %}
### Timeout
Time amount to be waited for each request in seconds. (default: 30)
{% endstep %}
{% endstepper %}
{% hint style="warning" %}
⚠️ **Attention**\
Please perform a **connection test** to ensure there is a valid connection to the host.\
When the discovery operation is finalized, you will be able to see the details on the **Assets** page.
{% endhint %}
# Black Kite
## Connection Requirements
{% stepper %}
{% step %}
### Domain
BlackKite Domain (default: `app.blackkitetech.com`)
{% endstep %}
{% step %}
### Client ID and Client Secret
To establish a connection, you will need a Client ID and Client Secret.
{% hint style="info" %}
To create the necessary Client ID and Client Secret for Black Kite integration, first log in to the platform with your credentials. Navigate to the "Integrations" option in the admin menu and use the "+ New Client Credential" option to generate a new client key. On the screen that appears, enter a name and token lifetime for your key, then assign the appropriate user role. After confirming the settings and clicking "Create," the Client ID and Client Secret will be displayed. Be sure to carefully record these details, especially the Client Secret, as it's shown only once and is essential for integration.
{% endhint %}
{% endstep %}
{% endstepper %}
{% hint style="warning" %}
Please perform a **connection test** to ensure there is a valid connection to the host.\
When the discovery operation is finalized, you will be able to see the details on the **Assets** page.
{% endhint %}
# BlackBerry Unified Endpoint Management (UEM)
## Connection Requirements
{% stepper %}
{% step %}
### Host
The address of your BlackBerry Unified Endpoint Management (UEM) server.
{% endstep %}
{% step %}
### Port
Port number (optional, default: **18084**).
{% endstep %}
{% step %}
### Tenant ID
Ask your organization’s BlackBerry UEM administrator for the tenant ID of the UEM domain.\
The administrator specifies the tenant ID during the UEM installation process.
{% endstep %}
{% step %}
### Username
The username of a UEM administrator account created in the BlackBerry UEM management console.
{% endstep %}
{% step %}
### Password
The password of the administrator account.
{% endstep %}
{% step %}
### Domain
Specifies the user's logon domain.\
Required for **AD (Active Directory)** and **LDAP (Lightweight Directory Access Protocol)** authentication.
{% endstep %}
{% step %}
### Provider Type
Determines how the user will be authenticated. Choose one of the following:
* **AD** – Active Directory authentication
* **LDAP** – Lightweight Directory Access Protocol authentication
* **LOCAL** – Local authentication in UEM
{% endstep %}
{% step %}
### Is Secure?
Indicates whether the IP address is secure. (optional, default: **Secure**)
{% endstep %}
{% endstepper %}
{% hint style="warning" %}
⚠️ Attention\
Please perform a **connection test** to ensure there is a valid connection to the BlackBerry Unified Endpoint Management (UEM) host.\
When the discovery operation is finalized, you will be able to see the details on the **Assets** page.
{% endhint %}
# Blackberry CylanceProtect
## Connection Requirements
{% stepper %}
{% step %}
### Domain
Blackberry CylanceProtect domains are region-based. Choose the appropriate service endpoint for your region:
* **Asia-Pacific – North (apne1):**
* **Asia-Pacific – Southeast (au):**
* **Europe – Central (euc1):**
* **North America:**
* **South America (sae1):**
* **US Government (us):**
{% endstep %}
{% step %}
### Application ID & Secret
The application’s unique identifier and secret used to sign the authentication token.
To create an application integration, follow these steps:
{% stepper %}
{% step %}
### Log in as an administrator
Log in to the management console as an administrator (only administrators can create integrations).
{% endstep %}
{% step %}
### Go to Integrations
From the menu bar, click **Settings → Integrations**.
{% endstep %}
{% step %}
### Add Application
Click **Add Application**.
{% endstep %}
{% step %}
### Name the application
Enter a unique application name.
{% endstep %}
{% step %}
### Select access privileges
Select the required access privileges for console data types.\
(If no privileges are selected, the application will not have access.)
{% endstep %}
{% step %}
### Save
Click **Save**.
{% endstep %}
{% step %}
### Store credentials
Copy and securely store the **Application ID** and **Application Secret**, or view them later from the Integrations page.
{% endstep %}
{% endstepper %}
{% endstep %}
{% step %}
### Tenant ID
Tenant ID (Directory ID) of the Blackberry CylanceProtect tenant.
{% endstep %}
{% endstepper %}
{% hint style="warning" %}
⚠️ Attention
Please perform a **connection test** to ensure there is a valid connection to the Blackberry CylanceProtect host.\
When the discovery operation is finalized, you will be able to see the details on the **Assets** page.
{% endhint %}
# BloodHound
## Connection Requirements
{% stepper %}
{% step %}
### Domain
Enter the Active Directory domain you want BloodHound to analyze.
{% endstep %}
{% step %}
### Username
This username is obtained from the Active Directory account that will be used to connect to BloodHound.\
If you do not have an account, you may create a new AD account with the required permissions or ask your administrator to provide credentials.
{% endstep %}
{% step %}
### Password
Password for the provided user account.
{% endstep %}
{% endstepper %}
{% hint style="warning" %}
Please perform a **connection test** to ensure there is a valid connection to the BloodHound host.\
When the discovery operation is finalized, you will be able to see the details on the **Assets** page.
{% endhint %}
# Bluecoat Proxy
## Connection Requirements
{% stepper %}
{% step %}
#### IP
IP address of the Blue Coat Proxy.
{% endstep %}
{% step %}
#### Port
Port number (optional, default: 8082).
{% endstep %}
{% step %}
#### Username
The username which is going to be used by OctoXLabs CSAM PLATFORM Asset to fetch data from Blue Coat Proxy.
{% endstep %}
{% step %}
#### Password
The Password of the provided username.
{% endstep %}
{% step %}
#### Timeout
Time to return API call (default: 30).
{% endstep %}
{% step %}
#### SSL
Use SSL for connection (optional, default: Encrypted).
{% endstep %}
{% endstepper %}
{% hint style="warning" %}
⚠️ **Attention**\
Please perform a **connection test** to ensure there is a valid connection to the host.\
When the discovery operation is finalized, you will be able to see the details on the **Assets** page.
{% endhint %}
# BMC AR System Mid Tier
## Connection Requirements
### 1 - IP
The IP address or hostname of the BMC AR System Mid Tier server.
### 2 - Port
The port number of the BMC AR System Mid Tier server. (default: 8008)
### 3 - Username
The username of a BMC AR System account with read access to the required forms.
### 4 - Password
The password for the BMC AR System account.
### 5 - Device Form Name
The name of the AR System form used to store device/asset records (e.g. AST:Attributes). Leave empty to skip device collection.
To find the form name, navigate to the form in the Mid Tier interface. The form name is the last segment of the URL, for example: `http://arserver:8008/arsys/forms/arserver/AST:Attributes`
### 6 - Device Primary Field
The field name in the device form that holds the unique identifier for each device (e.g. Hostname, Device Name, Name).
### 7 - Users Form Name
The name of the AR System form used to store user records (e.g. CTM:People). Leave empty to skip user collection.
To find the form name, navigate to the form in the Mid Tier interface. The form name is the last segment of the URL, for example: `http://arserver:8008/arsys/forms/arserver/CTM:People`
### 8 - Users Primary Field
The field name in the user form that holds the unique identifier for each user (e.g. Username, Email, Name (if it's unique)).
### 9 - Is Secure?
Choose this if your connection is going to be over HTTPS. (default: False)
### 10 - Timeout
The amount of time (in seconds) to wait for API responses. (default: 30)
{% hint style="info" %}
**Default Values**
* **Port**: 8008
* **Is Secure**: false
* **Timeout**: 30
{% endhint %}
{% hint style="danger" %}
**Attention**
Please perform a connection test to ensure there is a valid connection to the BMC AR System Mid Tier host. When the discovery operation is finalized you will be able to see the details on the Assets page.
{% endhint %}
# BMC Client Management
## Connection Requirements
{% stepper %}
{% step %}
### IP or Hostname
IP address or Hostname of the BMC Client Manager host.
{% endstep %}
{% step %}
### Username
The username which is going to be used by OctoXLabs CSAM PLATFORM Asset to fetch data from BMC Client Management.
{% hint style="info" %}
If your credentials contain a domain name, enter the credentials in the following format (use two backslashes):
`domain\\username`
For example: `production\\administrator`
{% endhint %}
{% endstep %}
{% step %}
### Password
Password of the provided username.
{% endstep %}
{% step %}
### Port
Port number (optional, default: 1611).
{% endstep %}
{% step %}
### SSL
Use SSL for connection (optional, default: Encrypted).
{% endstep %}
{% endstepper %}
---
[Next Page](/llms-full.txt/1)